


Switch GPU modes in Windows
Open the Start menu and type cmd on the keyboard. Then, right-click on the Command Prompt app and select Run as administrator. Finally, execute the NVIDIA® System Management Interface command-line utility:
nvidia-smi.exeThis command will display a summary about installed NVIDIA® GPUs. Keep in mind that NVIDIA® GPU drivers operates in WDDM (Windows Display Driver Model) mode by default:

As you can see, some system processes are running using GPU with ID 0. This mode is incompatible with many compute capabilities provided by NVIDIA®.
WDDM to TCC
For instance, if you want to run C/C++ CUDA® applications, you need to switch the driver on each GPU to a different operating mode: TCC (Tesla® Compute Cluster):
nvidia-smi -i 0 -dm TCCSet driver model to TCC for GPU 00000000:03:00.0. All done. Reboot required.
Here, 0 is an ID of the GPU. You can see all IDs (started from 0) in the nvidia-smi output (first column). Apply this action to each GPU and finally reboot the server.
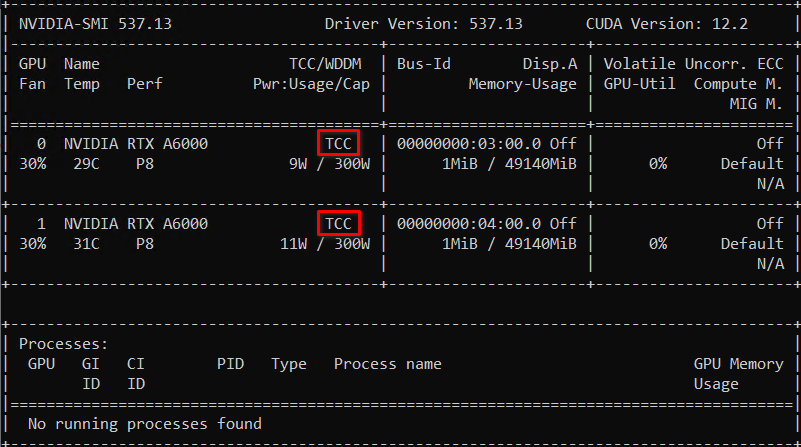
After the boot process finished, execute nvidia-smi utility again. It will shows that driver mode was changed to TCC:
TCC to WDDM
If you want to revert changes, you can execute the following command:
nvidia-smi -i 0 -dm WDDMIn some cases, you need to use a hybrid method. For example, if you use Houdini with a custom rendering engine like RedShift, one GPU will handle application resources and should be left in WDDM mode. It makes sense to switch the remaining GPUs to TCC mode to achieve optimal performance.
See also:
Updated: 04.01.2026
Published: 08.05.2024