


Stable Diffusion WebUI

Generative neural networks seem magical. They answer questions, create images, and even write code in various programming languages. The success of these networks has two components: pre-trained models and hardware accelerators. Certainly, it's possible to use CPU cores for this workload, but it would be like a snail race. Generating one small picture can take a significant amount of time - tens of minutes. Generating the same picture on a GPU would take hundreds of times less.
The first secret lies in the number of cores. CPU cores are universal and can handle complex instructions. However, conventional server processors have a maximum of 64 cores. Even in multiprocessor systems, the number of cores rarely exceeds 256. GPU cores are simpler but as a result, many more of them fit on the chip. For example, one NVIDIA® RTX™ 4090 has 16,384 cores.
The second secret is that the workload can be divided into many simple tasks, which can be run in parallel threads on dedicated GPU cores. This trick significantly speeds up data processing. Today, we will see how it works and deploy a generative neural network Stable Diffusion Web UI on the LeaderGPU infrastructure. Take, for example, a server with an NVIDIA® RTX™ 4090 which has 16,384 GPU cores. As an operating system, we selected the current LTS-release Ubuntu 22.04 and chose the “Install NVIDIA® drivers and CUDA® 11.8” option.
System prepare

Before we start, let's consider memory. Stable Diffusion is a large system which can occupy up to 13G on your hard disk. The standard virtual disk in a LeaderGPU installation is 100G. The operating system takes up 25G. If we deploy Stable Diffusion without extending the home partition, we’ll exhaust all free memory and encounter a "No space left on device" error. It's a good idea to extend our home directory.
Extend home directory
First, we need to check all available disks.
sudo fdisk -lDisk /dev/sda: 447.13 GiB, 480103981056 bytes, 937703088 sectors Disk model: INTEL SSDSC2KB48 Units: sectors of 1 * 512 = 512 bytes Sector size (logical/physical): 512 bytes / 4096 bytes I/O size (minimum/optimal): 4096 bytes / 4096 bytes Disk /dev/sdb: 50 GiB, 53687091200 bytes, 104857600 sectors Disk model: VIRTUAL-DISK Units: sectors of 1 * 512 = 512 bytes Sector size (logical/physical): 512 bytes / 512 bytes I/O size (minimum/optimal): 512 bytes / 512 bytes Disklabel type: gpt Disk identifier: 9D4C1F0C-D4A7-406E-AECB-BF57E4726437
Then we need to create a new Linux partition on our physical SSD-drive, /dev/sda:
sudo fdisk /dev/sdaPress the following keys, one by one: g → n → Enter → Enter → Enter → w. This will result in a new /dev/sda1 partition without a filesystem. Now, create an ext4 filesystem on it:
sudo mkfs.ext4 /dev/sda1When the process is finished, we move to the next step.
Warning! Please proceed with the following operation with great care. Any mistake made while modifying the fstab file can result in your server being unable to boot normally and may require a complete reset of the operating system.
sudo blkid/dev/sdb2: UUID="6b17e542-0934-4dba-99ca-a00bd260c247" BLOCK_SIZE="4096" TYPE="ext4" PARTUUID="70030755-75d8-4339-a4e0-26a97f1d1c5d" /dev/loop1: TYPE="squashfs" /dev/sdb1: PARTUUID="63ff1714-bd29-4062-be04-21af32423c0a" /dev/loop4: TYPE="squashfs" /dev/loop0: TYPE="squashfs" /dev/sda1: UUID="fb2ba455-2b8d-4da0-8719-ce327d0026bc" BLOCK_SIZE="4096" TYPE="ext4" PARTUUID="6e0108df-b000-5848-8328-b187daf37a4f" /dev/loop5: TYPE="squashfs" /dev/loop3: TYPE="squashfs"
Copy UUID (fb2ba455-2b8d-4da0-8719-ce327d0026bc in example) of the /dev/sda1 partition. Next, we will instruct the system to automatically mount this drive by its UUID at boot time:
sudo nano /etc/fstabEnter this line before /swap.img… string:
/dev/disk/by-uuid/ /home/usergpu ext4 defaults defaults Example:
# /etc/fstab: static file system information. # # Use 'blkid' to print the universally unique identifier for a # device; this may be used with UUID= as a more robust way to name devices # that works even if disks are added and removed. See fstab(5). # ## / was on /dev/sdb2 during curtin installation /dev/disk/by-uuid/6b17e542-0934-4dba-99ca-a00bd260c247 / ext4 defaults,_netdev 0 1 /dev/disk/by-uuid/fb2ba455-2b8d-4da0-8719-ce327d0026bc /home/usergpu ext4 defaults defaults /swap.img none swap sw 0 0
Exit with the Ctrl + X keyboard shortcut and confirm the file save by pressing Enter. The new settings will be applied at the next system start. Let’s reboot the server:
sudo shutdown -r nowAfter rebooting, we can check all mounted directories with the following command:
df -hFilesystem Size Used Avail Use% Mounted on tmpfs 6.3G 1.7M 6.3G 1% /run /dev/sdb2 49G 23G 24G 50% / tmpfs 32G 0 32G 0% /dev/shm tmpfs 5.0M 0 5.0M 0% /run/lock /dev/sda1 440G 28K 417G 1% /home/usergpu tmpfs 6.3G 4.0K 6.3G 1% /run/user/1000
Superb! But now we don't have access to write something in our home directory because it was changed by the fstab configuration file. It’s time to reclaim ownership of the directory:
sudo chown -R usergpu /home/usergpuGood job! Let’s move to the next step.
Install basic packages
Update the software cache from the official Ubuntu repositories and upgrade some packages:
sudo apt update && sudo apt -y upgradeThe system has informed that a new kernel was installed and it will be operational after system reboot. Select OK twice.
Next, we need to resolve dependencies, which require Stable Diffusion. The first package adds Python virtual environment functionality:
sudo apt install python3-venvThe second package adds an implementation of the C programming language’s malloc() function customized by Google. It prevents “Cannot locate TCMalloc” error and improves CPU memory usage.
sudo apt install -y --no-install-recommends google-perftoolsFinally, reboot the server again:
sudo shutdown -r nowStable diffusion automatic 1111: install script

The easiest way to install Stable Diffusion with WebUI is by using the premade script written by GitHub user AUTOMATIC1111. This script downloads and sets up these two parts while resolving all necessary dependencies.
Let’s download the script:
wget https://raw.githubusercontent.com/AUTOMATIC1111/stable-diffusion-webui/master/webui.shThen, give it access to change data and execute as a program:
chmod a+x webui.shExecute the downloaded script:
./webui.sh This process may take a couple of minutes. Everything is ready to create perfect images with Stable Diffusion.
Troubleshooting
If you encounter the error “Torch is not able to use GPU”, you can fix it by reinstalling via apt:
sudo apt -y install nvidia-driver-535You need to reboot the operating system to enable the driver:
sudo shutdown -r nowGenerate

The installation script ./webui.sh has another function. It simultaneously serves the server part of Stable Diffusion and WebUI. However, if you use it without arguments, the server will be available as a local daemon at http://127.0.0.1:7860. This can be solved in two ways: port forwarding through an SSH-tunnel or allowing connections from external IPs.
The second way is simpler: just add the --listen option and you can connect to the web interface at http://[YOUR_LEADERGPU_SERVER_IP_ADDRESS]:7860. However, this is completely insecure, as every internet user will have access. To prevent unauthorized usage, add --gradio-auth option alongside the username and password, separated by colon:
./webui.sh --listen --gradio-auth user:passwordThis adds a login page to your WebUI instance.The script will download basic models and required dependencies for the first time:
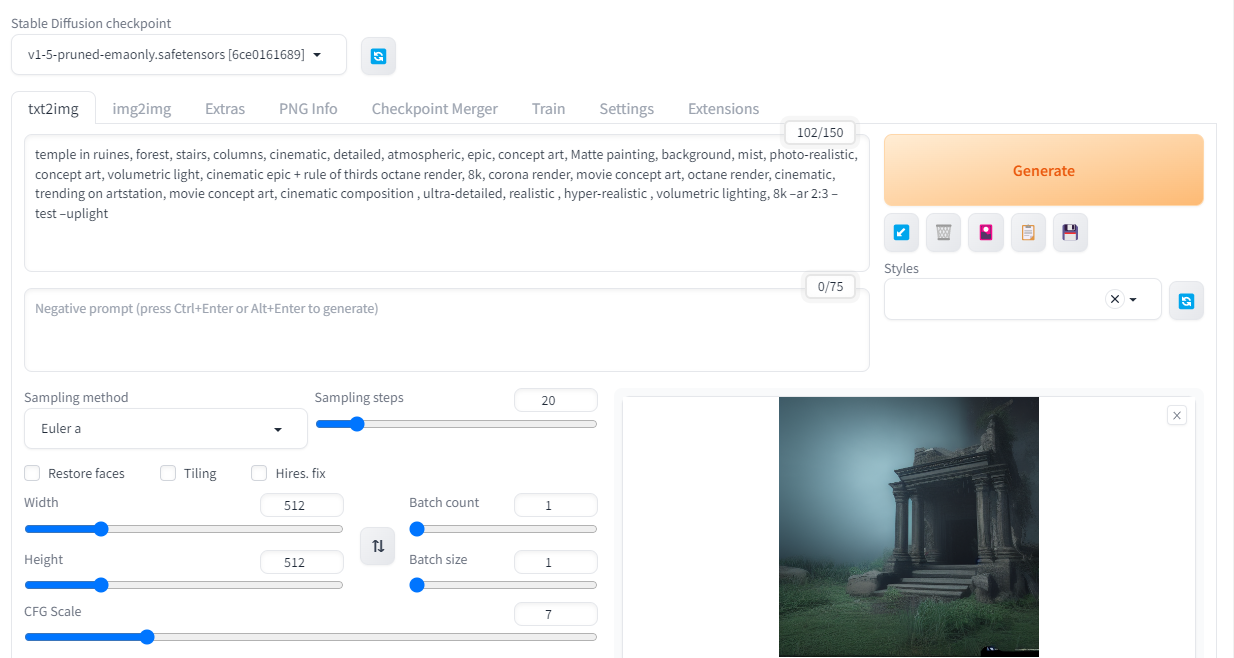
You can enjoy the result. Just enter a few prompts, separate them by commas, and click the Generate button. After a few seconds, an image generated by the neural network will be displayed.
Conclusion
We've come all the way from an empty LeaderGPU server with just a pre-installed operating system to a ready instance with Stable Diffusion and a WebUI interface. Next time, we’ll learn more about software performance tuning and how to properly enhance your Stable Diffusion instance with new versions of drivers and packages.
See also:
Updated: 04.01.2026
Published: 25.11.2024


