


Stable Diffusion Models: customization and options
Tuning is an excellent way to enhance every car or gadget. Generative neural networks can be tuned as well. Today, we don't want to delve deeply into the structure of Stable Diffusion, but we aim to achieve better results than a standard setup.
There are two easy ways to do this: installing custom models and utilizing standard optimization options. In this article, we’ll learn how to install new models into Stable Diffusion and which options allow us to use hardware more effectively.
If you want to share funny pictures of cute cats or great looking food, you usually post them on Instagram. If you develop applications and want to make the code available to everyone, you post it on GitHub. But if you train a graphical AI-model and want to share it, you should pay attention to CivitAI. This is a huge platform to share knowledge and results with community members.
Before you start downloading, you need to change the working directory. All AI models in Stable Diffusion are placed in the "models" directory:Before you start downloading, you need to change the working directory. All AI models in Stable Diffusion are placed in the "models" directory:
cd stable-diffusion-webui/models/Stable-diffusionLet's check which models are provided by default:
ls -a'Put Stable Diffusion checkpoints here.txt' v1-5-pruned-emaonly.safetensors
There is only one model with the name “v1-5-pruned-emaonly” and the extension “safetensors”. This model is a good starting point, but we have five more interesting models. Let’s download and compare them with the standard model.
Stable diffusion prompts
To visually show the difference between them, we came up with simple prompts:
princess, magic, fairy tales, portrait, 85mm, colorful
For many models, accurately representing geometry and facial features can be a significant challenge. To address this, add negative prompts to ensure images are generated without these characteristics:
poorly rendered face, poorly drawn face, poor facial details, poorly drawn hands, poorly rendered hands, low resolution, bad composition, mutated body parts, blurry image, disfigured, oversaturated, bad anatomy, deformed body features
Set the maximum value of sampling steps (150) to get more details in the result.
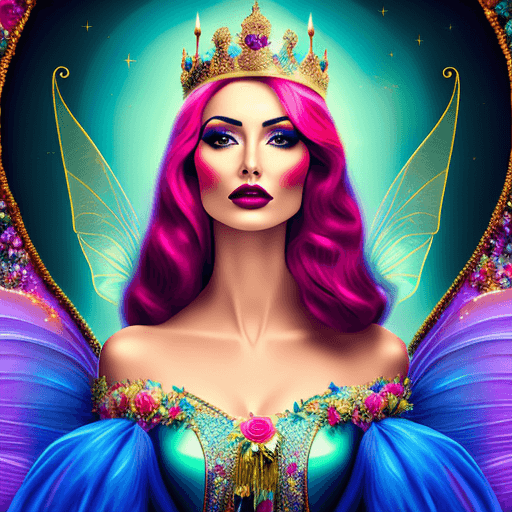
Standard model
The standard model performs well in such tasks. However, some details are not quite accurate. For example, there is a problem with the eyes: they are clearly out of proportion:
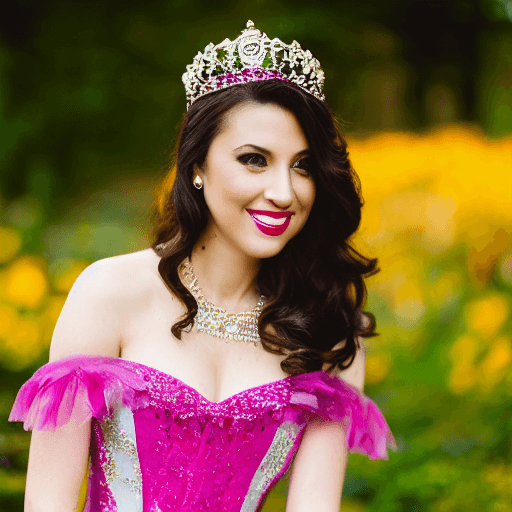
If you look at the diadem, it is also crooked and asymmetrical. The rest of the details are well-executed and correspond to the given prompts. The background is blurry because we set the prompt “85mm”. This is a very commonly used focal length for portraits in professional photography.
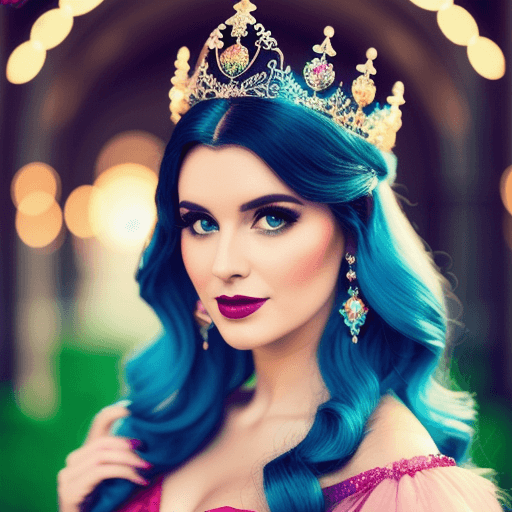
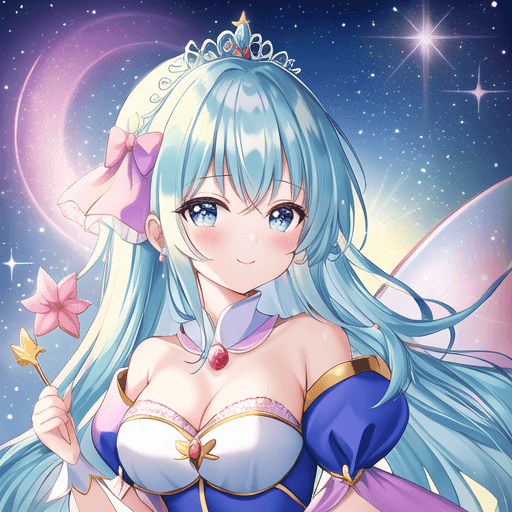
Realistic Vision
This model is great for portraits. The image appears as if taken with a quality lens with the specified focal length. The proportions of the face and body are accurate, the dress fits perfectly, and the diadem on the head looks aesthetically pleasing:
By the way, the author recommends using the following template for negative prompts:
deformed iris, deformed pupils, semi-realistic, cgi, 3d, render, sketch, cartoon, drawing, anime:1.4), text, close up, cropped, out of frame, worst quality, low quality, jpeg artifacts, ugly, duplicate, morbid, mutilated, extra fingers, mutated hands, poorly drawn hands, poorly drawn face, mutation, deformed, blurry, dehydrated, bad anatomy, bad proportions, extra limbs, cloned face, disfigured, gross proportions, malformed limbs, missing arms, missing legs, extra arms, extra legs, fused fingers, too many fingers, long neck
But even with our quite simple prompts, the result is excellent.
Download the model here: Realistic VisionDeliberate
Another amazing model for such purposes. The details are also well worked out here, but be careful and monitor the number of fingers. This is a very common problem with neural networks: they can often draw extra fingers or even entire limbs.
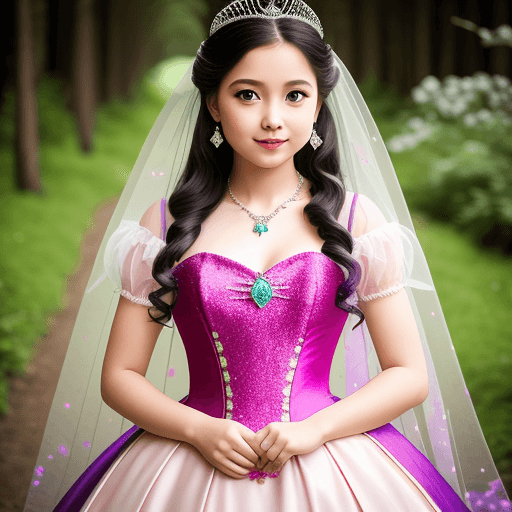
Creating visual lines is one of favorite movie techniques. So, this model also chose to draw a person against the background of a forest path.
Download the model here: Deliberate
OpenJourney
Among generative neural networks, Midjourney (MJ) has received special attention. MJ was a pioneer in this field and is often held up as an example to others. The images it creates have a unique style. OpenJourney is inspired by the MJ style and is a suitably tuned Stable Diffusion.
Generated images that look like a cartoon. They are vibrant and bright. For better results, add the mdjrny-v4 style prompt
Download the model here: OpenJourney
Anything
This model creates images akin to a professional manga artist (a person who draws comics). Thus, we got an anime-style princess.
This model is trained on images with a resolution of 768x768. You may set this resolution to get better results than standard 512x512.
Download the model here: Anything
Corporate Memphis
This style of images gained wild popularity in the early 2020s and was widely used as a corporate style in different high-tech companies. Despite criticism, it is often found in presentations and websites.

The princess turned out to be minimalistic, but quite pretty. Particularly amusing were the details that the model placed on the background.
Download the model here: Corporate Memphis
Stable Diffusion Options
Stable Diffusion consumes a lot of resources, so many options have been developed for it. The most popular of them is --xformers. This option enables two optimization mechanisms. The first reduces memory consumption and the second is used to increase speed.
If you try to add --xformers without additional steps, you will get an error saying that the packages (torch and torchvision) are compiled for different versions of CUDA®. To fix this, we need to enter the Python virtual environment (venv) which is used for Stable Diffusion. After that, install the packages for the desired version of CUDA® (v1.18).
First we must update apt packages cache and install package installer for Python (pip). Next step is to activate Python venv with the activate script:
source stable-diffusion-webui/venv/bin/activateAfter that, the command line prompt changes to (venv) username@hostname:~$ Let’s install the packages torch and torchvision with CUDA® 11.8:
pip install torch==2.0.0+cu118 torchvision==0.15.1+cu118 --index-url https://download.pytorch.org/whl/cu118This process may take several minutes because the packages are quite large. You'll have just enough time to pour yourself some coffee. Finally, you can deactivate virtual environment and start Stable Diffusion with the --xformers option (replace [user] and [password] with your own values):
deactivate./webui --xformers --listen --gradio-auth [user]:[password]The faster alternative for --xformers is --opt-sdp-no-mem-attention. It consumes more memory but works a bit faster. You can use this option without additional steps.
Conclusion
Today, we examined the capabilities of Stable Diffusion when combined with other models added and optimization options. Remember, by increasing or decreasing the number of sampling steps, you can adjust the level of detail in the final image.
Of course, this is only a small part of what you can do with such a generative neural network. So order a GPU-server right now and start experimenting. Many more discoveries and opportunities await you. High-speed and powerful video cards will help you save time and generate cool images.
See also:
Updated: 04.01.2026
Published: 25.11.2024


