


Stable Diffusion: What is ControlNet

A common misconception among those first encountering generative neural networks is that controlling the final output is tremendously challenging, especially when attempting to alter the output through different prompt phrasing. Currently, a suite of tools known as ControlNet exists to facilitate relatively straightforward and effective control over the generation results.
In this article, we’ll demonstrate how to easily manipulate the pose of generated characters using pre-existing images and custom “skeletons”, with the help of one such tool, OpenPose.
Step 1. Install Stable Diffusion
Please use our step-by-step guide to install Stable Diffusion with the basic model and WebUI. This guide is based on the AUTOMATIC1111 script.
Step 2. Install ControlNet extension
We strongly advise against installing the ControlNet extension (sd-webui-controlnet) from the standard repository due to potential functionality issues. One significant issue we encountered during the preparation of this guide was the web interface freezing. Although the image is initially generated successfully, the WebUI becomes unresponsive when generating the image a second time. An alternative solution would be to install the same extension from an external source.
Open WebUI and follow the tabs: Extensions > Install from URL. Paste this URL in the appropriate field:
https://github.com/Mikubill/sd-webui-controlnetThen click Install button:

When the process is completed successfully, the following message should appear:
Installed into /home/usergpu/stable-diffusion-webui/extensions/sd-webui-controlnet. Use Installed tab to restart.
Let’s restart the URL by pressing Apply and restart UI button on the Installed tab:

After rebooting the interface, the new ControlNet element with many additional options will appear:

Step 3. Download OpenPose
Add HF key
Let’s generate and add an SSH-key that you can use in Hugging Face:
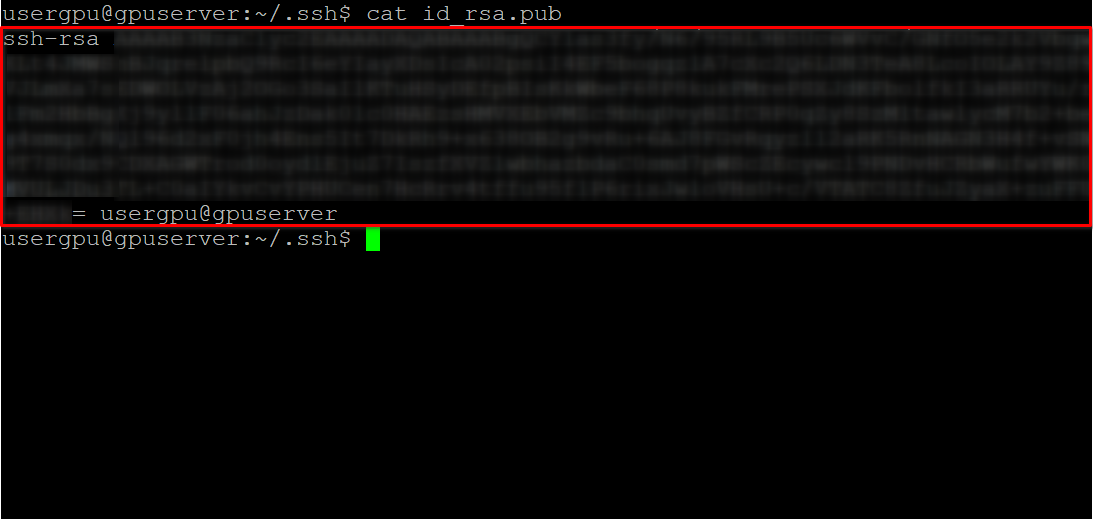
cd ~/.ssh && ssh-keygenWhen the keypair is generated, you can display the public key in the terminal emulator:
cat id_rsa.pubCopy all information starting from ssh-rsa and ending with usergpu@gpuserver, as shown in the following screenshot:
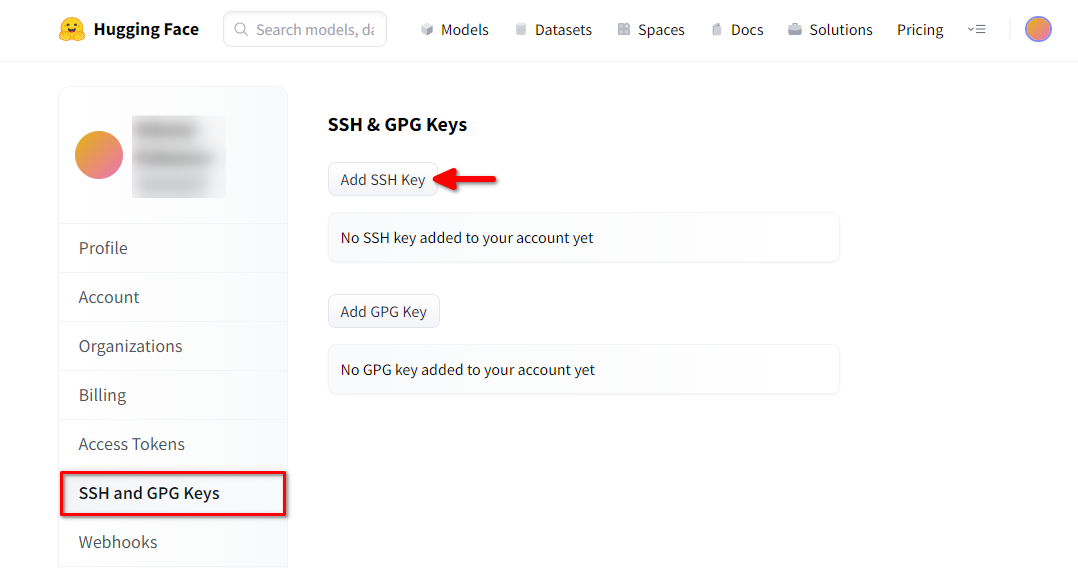
Open a web browser, type https://huggingface.co/ into the address bar, and press Enter. Login into your HF-account and open Profile settings. Then choose SSH and GPG Keys and click on the Add SSH Key button:
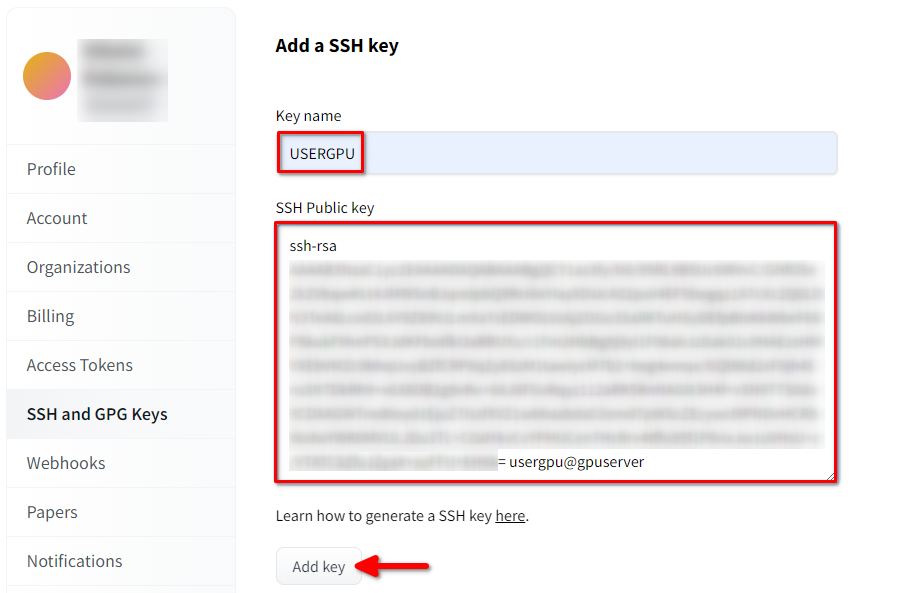
Fill in the Key name and paste the copied SSH Public key from the terminal. Save the key by pressing Add key:
Now, your HF-account is linked with the public SSH-key. The second part (private key) is stored on the server. The next step is to install a specific Git LFS (Large File Storage) extension, which is used for downloading large files such as neural network models.
Install Git LFS
The next step is to install a specific Git LFS (Large File Storage) extension, which is used for downloading large files such as neural network models. Open your home directory:
cd ~/Download and run the shell script. This script installs a new third-party repository with git-lfs:
curl -s https://packagecloud.io/install/repositories/github/git-lfs/script.deb.sh | sudo bashNow, you can install it using the standard package manager:
sudo apt-get install git-lfsLet’s configure git to use our HF nickname:
git config --global user.name "John"And linked to the HF email account:
git config --global user.email "john.doe@example.com"Download the repository
We recommend, if possible, using a local hard drive to download and store models. You can learn more about this from our guide, Disk partitioning in Linux. For this example, we have mounted an SSD-drive to the /mnt/fastdisk mountpoint. Let’s make it owned by the default user:
sudo chown usergpu:usergpu /mnt/fastdiskOpen the directory:
cd /mnt/fastdiskClone the ControlNet repository from HuggingFace. Previously installed Git-LFS will automatically replace pointers with real files:
git clone git@hf.co:lllyasviel/ControlNet-v1-1In this example, we add only one model to Stable Diffusion WebUI. However, you can copy all available models from the repository (~18GB):
cp /mnt/fastdisk/ControlNet-v1-1/control_v11p_sd15_openpose.pth /home/usergpu/stable-diffusion-webui/models/ControlNet/Step 4. Run generating process
The current model provided is quite basic and might not yield satisfactory results. Therefore, we suggest replacing it with a custom model. Guidelines on how to do this can be found in this article: Stable Diffusion Models: customization & options. For this example, we downloaded RealisticVision v6.0 B1.
If you want to generate your first image using OpenPose, open the ControlNet tab, choose OpenPose, tick Enable and Allow Preview. Then click to Upload to add an image containing the desired pose:

You can request the system to generate a pose preview by clicking the button with the explosion icon:

On the left, the original image is displayed. On the right, you can see the “skeleton” representing the pose as recognized by the neural network model:
 |
 |
Now you can type the main prompt, for example “dancing bear, by Pixar” or “dancing fox, by Pixar” and click the Generate button. After a few seconds you’ll get results like this:
 |
 |
The system will attempt to generate a new picture, given the “skeleton” obtained from the original image. In some cases, the pose may not be accurate, but this can be easily corrected by manually editing the “skeleton”.
Step 5. Changing pose
While it may seem like magic, the model isn’t perfect, and occasional errors can impact the final image. To avoid issues during image generation, you have the option to manually adjust the “skeleton” by clicking on the Edit button:

In the provided editor, you can easily adjust the pose by dragging and dropping, or remove unwanted points with a right-click. After that, just click the Send pose to ControlNet button and the new pose will be applied:

Beyond OpenPose, ControlNet offers a variety of tools to customize and perfect your results. Moreover, the dedicated servers provided by LeaderGPU ensure a quick and convenient process.
See also:
Updated: 04.01.2026
Published: 21.01.2025


