


Your own LLaMa 2 in Linux

Step 1. Prepare operating system
Update cache and packages
Let’s update the package cache and upgrade your operating system before you start setting up LLaMa 2. Please note that for this guide, we are using Ubuntu 22.04 LTS as the operating system:
sudo apt update && sudo apt -y upgradeAlso, we need to add Python Installer Packages (PIP), if it isn’t already present in the system:
sudo apt install python3-pipInstall NVIDIA® drivers
You can use the automated utility that is included in Ubuntu distributions by default:
sudo ubuntu-drivers autoinstallAlternatively, you can install NVIDIA® drivers manually using our step-by-step guide. Don’t forget to reboot the server:
sudo shutdown -r nowStep 2. Get models from MetaAI
Official request
Open the following address in your browser: https://ai.meta.com/resources/models-and-libraries/llama-downloads/
Fill in all necessary fields, read user agreement and click on the Agree and Continue button. After a few minutes (hours, days), you’ll receive a special download URL, which grants you permission to download models for a 24-hours period.
Clone the repository
Before downloading, please check the available storage:
df -hFilesystem Size Used Avail Use% Mounted on tmpfs 38G 3.3M 38G 1% /run /dev/sda2 99G 24G 70G 26% / tmpfs 189G 0 189G 0% /dev/shm tmpfs 5.0M 0 5.0M 0% /run/lock /dev/nvme0n1 1.8T 26G 1.7T 2% /mnt/fastdisk tmpfs 38G 8.0K 38G 1% /run/user/1000
If you have unmounted local disks, please follow the instructions in Disk partitioning in Linux. This is important because the downloaded models can be very large, and you need to plan their storage location in advance. In this example, we have a local SSD mounted in the /mnt/fastdisk directory. Let’s open it:
cd /mnt/fastdiskCreate a copy of the original LLaMa repository:
git clone https://github.com/facebookresearch/llamaIf you encounter a permission error, simply grant permissions to the usergpu:
sudo chown -R usergpu:usergpu /mnt/fastdisk/Download via script
Open the downloaded directory:
cd llamaRun the script:
./download.shPast the URL provided from MetaAI and select all necessary models. We recommend downloading all available models to avoid requesting permission again. However, if you need a specific model, then download only that one.
Fast test via example app
To begin, we can check for any missing components. If any libraries or applications are missing, the package manager will automatically install them:
pip install -e .The next step is to add new binaries to PATH:
export PATH=/home/usergpu/.local/bin:$PATHRun the demo example:
torchrun --nproc_per_node 1 /mnt/fastdisk/llama/example_chat_completion.py --ckpt_dir /mnt/fastdisk/llama-2-7b-chat/ --tokenizer_path /mnt/fastdisk/llama/tokenizer.model --max_seq_len 512 --max_batch_size 6The application will create a compute process on the first GPU and simulate a simple dialog with typical requests, generating answers using LLaMa 2.
Step 3. Get llama.cpp
LLaMa C++ is a project created by Bulgarian physicist and software developer Georgi Gerganov. It has many useful utilities that make working with this neural network model easier. All parts of llama.cpp are open source software and are distributed under the MIT license.
Clone the repository
Open the working directory on the SSD:
cd /mnt/fastdiskClone the project’s repository:
git clone https://github.com/ggerganov/llama.cpp.gitCompile apps
Open the cloned directory:
cd llama.cppStart the compilation process with the following command:
makeStep 4. Get text-generation-webui
Clone the repository
Open the working directory on the SSD:
cd /mnt/fastdiskClone the project’s repository:
git clone https://github.com/oobabooga/text-generation-webui.gitInstall requirements
Open the downloaded directory:
cd text-generation-webuiCheck and install all missing components:
pip install -r requirements.txtStep 5. Convert PTH to GGUF
Common formats
PTH (Python TorcH) — A consolidated format. Essentially, it’s a standard ZIP-archive with a serialized PyTorch state dictionary. However, this format has faster alternatives such as GGML and GGUF.
GGML (Georgi Gerganov’s Machine Learning) — This is a file format created by Georgi Gerganov, the author of llama.cpp. It is based on a library of the same name, written in C++, which has significantly increased the performance of large language models. It has now been replaced with the modern GGUF format.
GGUF (Georgi Gerganov’s Unified Format) — A widely used file format for LLMs, supported by various applications. It offers enhanced flexibility, scalability, and compatibility for most use cases.
llama.cpp convert.py script
Edit the parameters of the model before converting:
nano /mnt/fastdisk/llama-2-7b-chat/params.jsonCorrect "vocab_size": -1 to "vocab_size": 32000. Save the file and exit. Then, open the llama.cpp directory:
cd /mnt/fastdisk/llama.cppExecute the script which will convert model to GGUF format:
python3 convert.py /mnt/fastdisk/llama-2-7b-chat/ --vocab-dir /mnt/fastdisk/llamaIf all the previous steps are correct, you’ll receive a message like this:
Wrote /mnt/fastdisk/llama-2-7b-chat/ggml-model-f16.gguf
Step 6. WebUI
How to start WebUI
Open the directory:
cd /mnt/fastdisk/text-generation-webui/Execute the start script with some useful parameters:
- --model-dir indicates the correct path to the models
- --share creates a temporary public link (if you don’t want to forward a port through SSH)
- --gradio-auth adds authorization with a login and password (replace user:password with your own)
./start_linux.sh --model-dir /mnt/fastdisk/llama-2-7b-chat/ --share --gradio-auth user:passwordAfter successful launch, you’ll receive a local and temporary share link for access:
Running on local URL:  http://127.0.0.1:7860
Running on public URL: https://e9a61c21593a7b251f.gradio.live
This share link expires in 72 hours.
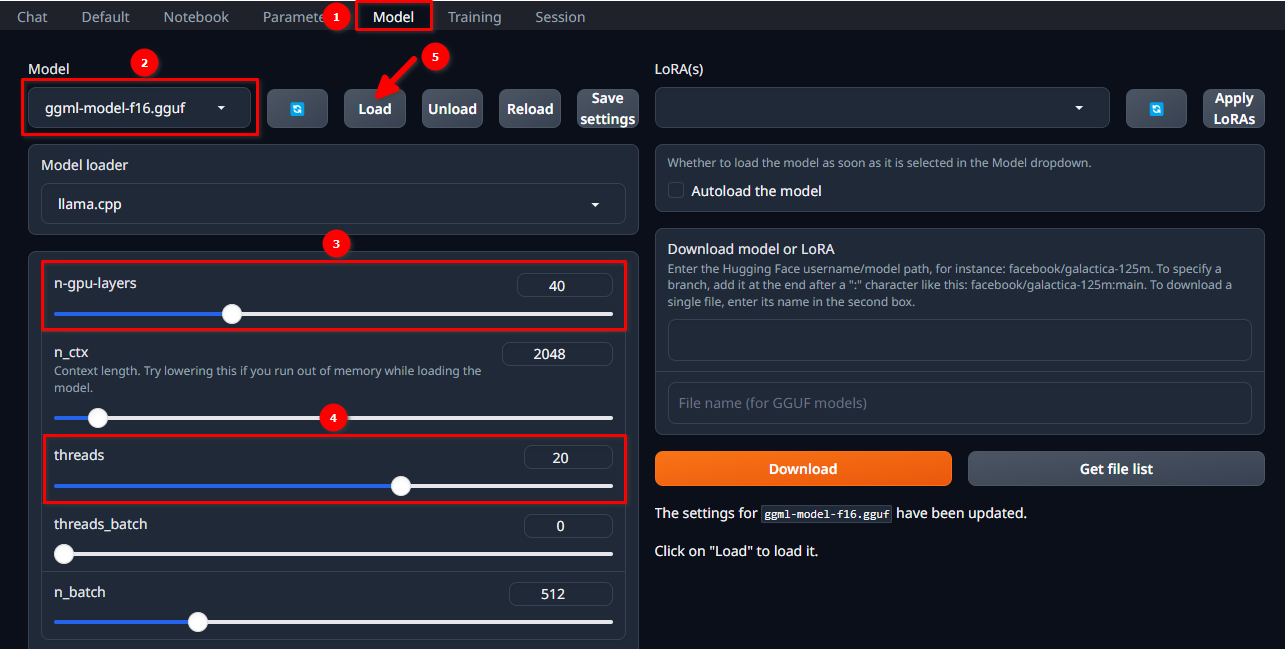
Load the model
Authorize in the WebUI using the selected username and password and follow these 5 simple steps:
- Navigate to the Model tab.
- Select ggml-model-f16.gguf from the drop-down menu.
- Choose how many layers you want to compute on the GPU (n-gpu-layers).
- Choose how many threads you want to start (threads).
- Click on the Load button.
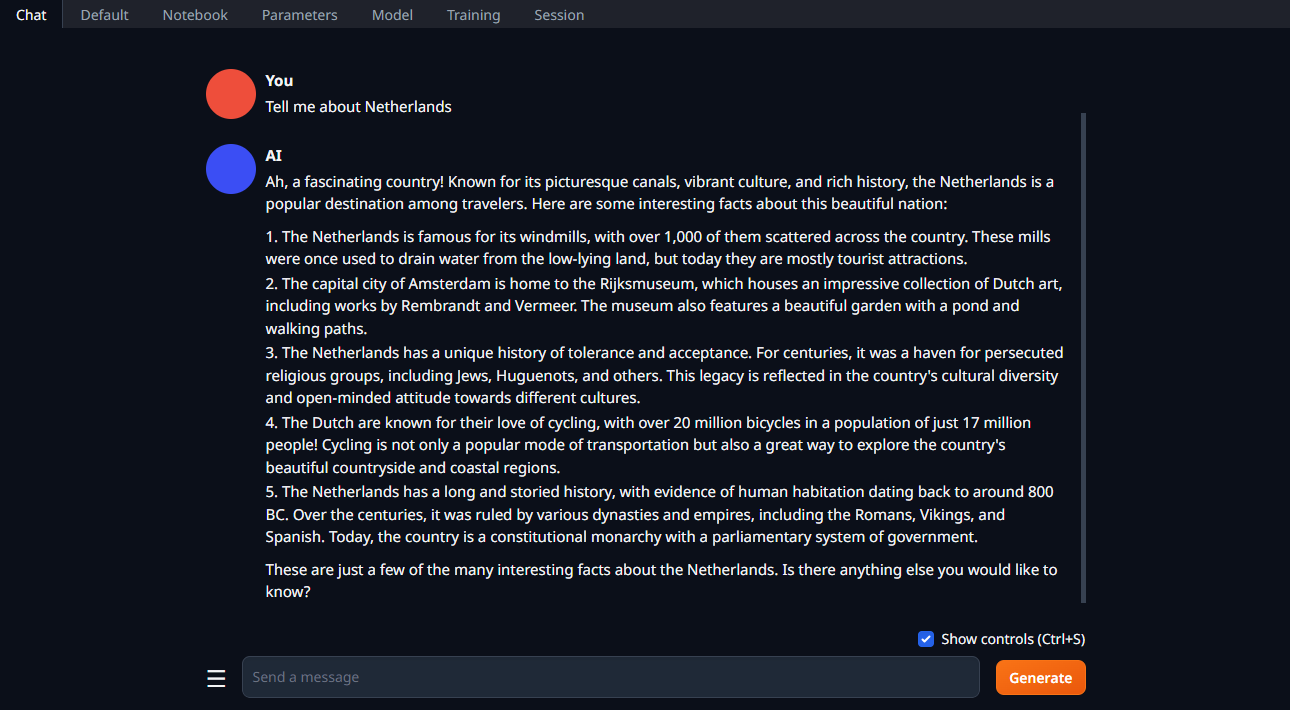
Start the dialog
Change the tab to Chat, type your prompt, and click Generate:
See also:
Updated: 04.01.2026
Published: 20.01.2025


