


Low-code AI app builder Langflow
Software development has evolved dramatically in recent years. Modern programmers now have access to hundreds of programming languages and frameworks. Beyond traditional imperative and declarative approaches, a new and exciting method of creating applications is emerging. This innovative approach harnesses the power of neural networks, opening up fantastic possibilities for developers.
People have grown accustomed to AI assistants in IDEs helping with code autocompletion and modern neural networks easily generating code for simple Python games. However, new hybrid tools are emerging that could revolutionize the development landscape. One such tool in Langflow.
Langflow serves multiple purposes. For professional developers, it offers better control over complex systems like neural networks. For those unfamiliar with programming, it enables the creation of simple yet practical applications. These goals are achieved through different means, which we’ll explore in more detail.
Neural networks
The concept of a neural network can be simplified for users. Imagine a black box that receives input data and parameters influencing the final result. This box processes the input using complex algorithms, often referred to as “magic”, and produces output data that can be presented to the user.
The inner workings of this black box vary based on the neural network’s design and training data. It’s crucial to understand that developers and users can never achieve 100% certainty in results. Unlike traditional programming where 2 + 2 always equals 4, a neural network might give this answer with 99% certainty, always maintaining a margin of error.
Control over a neural network's "thinking" process is indirect. We can only adjust certain parameters, such as "temperature." This parameter determines how creative or constrained the neural network can be in its approach. A low temperature value limits the network to a more formal, structured approach to tasks and solutions. Conversely, high temperature values grant the network more freedom, potentially leading to reliance on less reliable facts or even the creation of fictional information.
This example illustrates how users can influence the final output. For traditional programming, this uncertainty poses a significant challenge - errors may appear unexpectedly, and specific results become unpredictable. However, this unpredictability is primarily a problem for computers, not for humans who can adapt to and interpret varying outputs.
If a neural network’s output is intended for a human, the specific wording used to describe it is generally less important. Given the context, people can correctly interpret various results from the machine’s perspective. While concepts like “positive value”, "result achieved”, or “positive decision” might mean roughly the same thing to a person, traditional programming would struggle with this flexibility. It would need to account for all possible answer variations, which is nearly impossible.
On the other hand, if further processing is handed off to another neural network, it can correctly understand and process the obtained result. Based on this, it can then form its own conclusion with a certain degree of confidence, as mentioned earlier.
Low-code
Most programming languages involve writing code. Programmers create the logic for each part of an application in their minds, then describe it using language-specific expressions. This process forms an algorithm: a clear sequence of actions leading to a specific, predetermined result. It’s a complex task requiring significant mental effort and a deep understanding of the language’s capabilities.
However, there is no need to reinvent the wheel. Many problems faced by modern developers have already been solved in various ways. Relevant code snippets can often be found on StackOverflow. Modern programming can be likened to assembling a whole from parts of different construction sets. The Lego system offers a successful model, having standardized different sets of parts to ensure compatibility.
The low-code programming method follows a similar principle. Various code pieces are modified to fit together seamlessly and are presented to developers as ready-made blocks. Each block can have data inputs and outputs. Documentation specifies the task each block type solves and the format in which it accepts or outputs data.
By connecting these blocks in a specific sequence, developers can form an application’s algorithm and clearly visualize its operational logic. Perhaps the most well-known example of this programming method is the turtle graphics method, commonly used in educational settings to introduce programming concepts and develop algorithmic thinking.
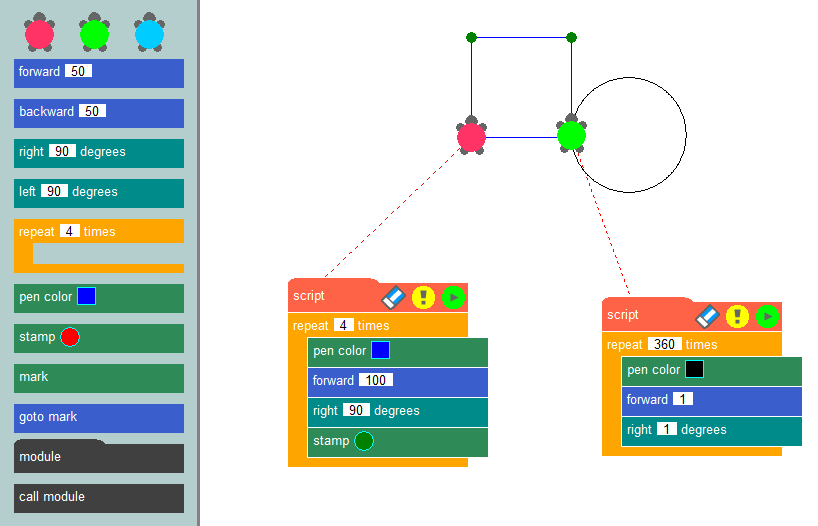
The essence of this method is simple: drawing images on the screen using a virtual turtle that leaves a trail as it crawls across the canvas. Using ready-made blocks, such as moving a set number of pixels, turning at specific angles, or raising and lowering the pen, developers can create programs that draw their desired pictures. Creating applications using a low-code constructor is similar to turtle graphics, but it allows users to solve a wide range of problems, not just drawing on a canvas.
This method was best implemented in IBM’s Node-RED programming tool. It was developed as a universal means of ensuring the joint operation of diverse devices, online services, and APIs. The equivalent of code snippets were nodes from the standard library (palette).

Node-RED’s capabilities can be expanded by installing add-ons or creating custom nodes that perform specific data actions. Developers place nodes from the palette onto the desktop and build relationships between them. This process creates the application’s logic, with visualization helping to maintain clarity.
Adding neural networks to this concept yields an intriguing system. Instead of processing data with specific mathematical formulas, you can feed it into a neural network and specify the desired output. Although the input data may vary slightly each time, the results remain suitable for interpretation by humans or other neural networks.
Retrieval Augmented Generation (RAG)
The accuracy of data in large language models is a pressing concern. These models rely solely on knowledge gained during training, which depends on the relevance of the datasets used. Consequently, large language models may lack sufficient relevant data, potentially leading to incorrect results.
To address this issue, data updating methods are necessary. Allowing neural networks to extract context from additional sources, such as websites, can significantly improve the quality of answers. This is precisely how RAG (Retrieval-Augmented Generation) works. Additional data is converted into vector representations and stored in a database.
In operation, neural network models can convert user requests into vector representations and compare them with those stored in the database. When similar vectors are found, the data is extracted and used in forming a response. Vector databases are fast enough to support this scheme in real-time.
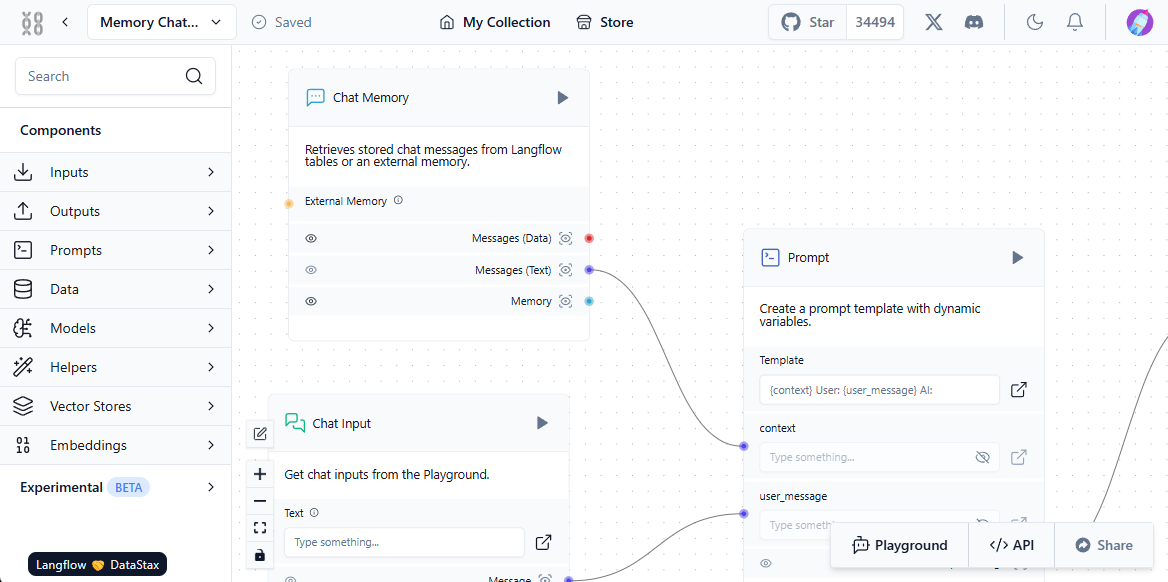
For this system to function correctly, interaction between the user, the neural network model, external data sources, and the vector database must be established. Langflow simplifies this setup with its visual component - users simply build standard blocks and "link" them, creating a path for data flow.
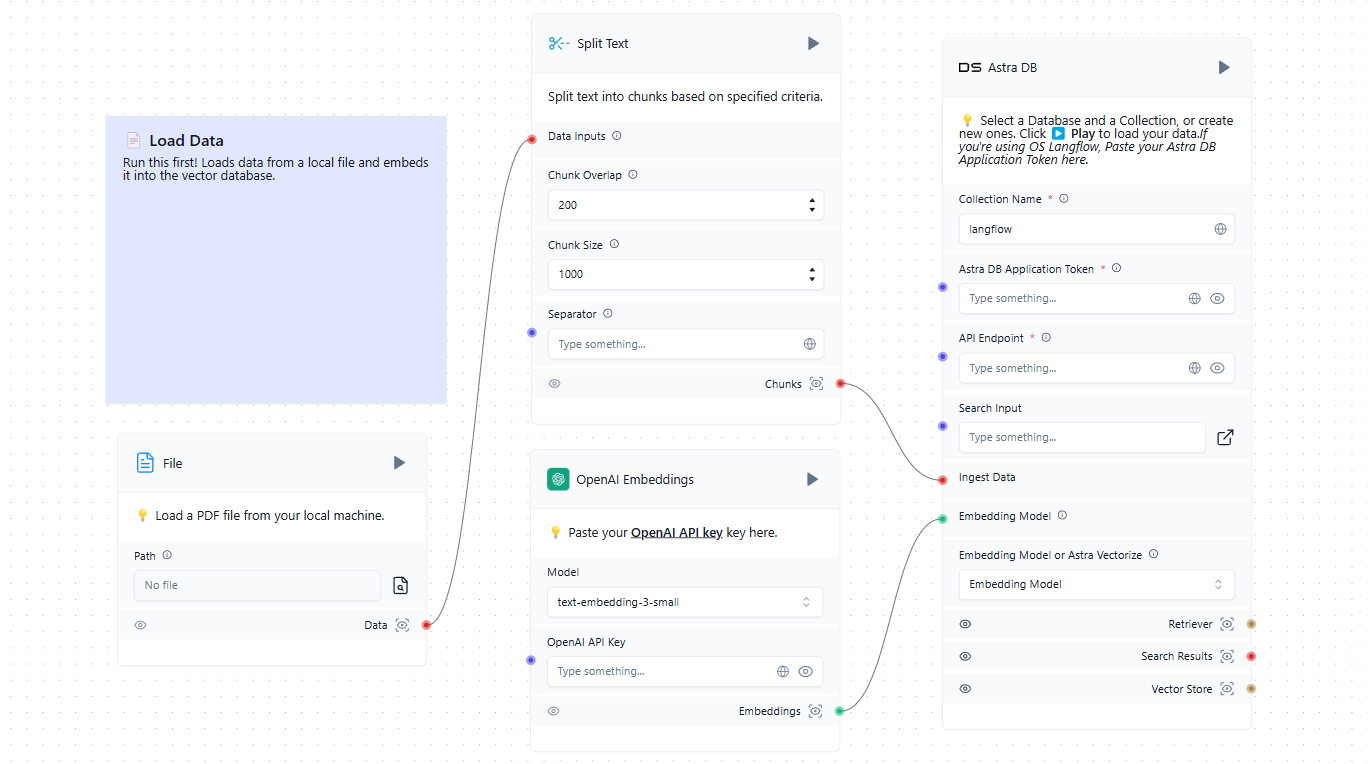
The first step is to populate the vector database with relevant sources. These can include files from a local computer or web pages from the Internet. Here's a simple example of loading data into the database:
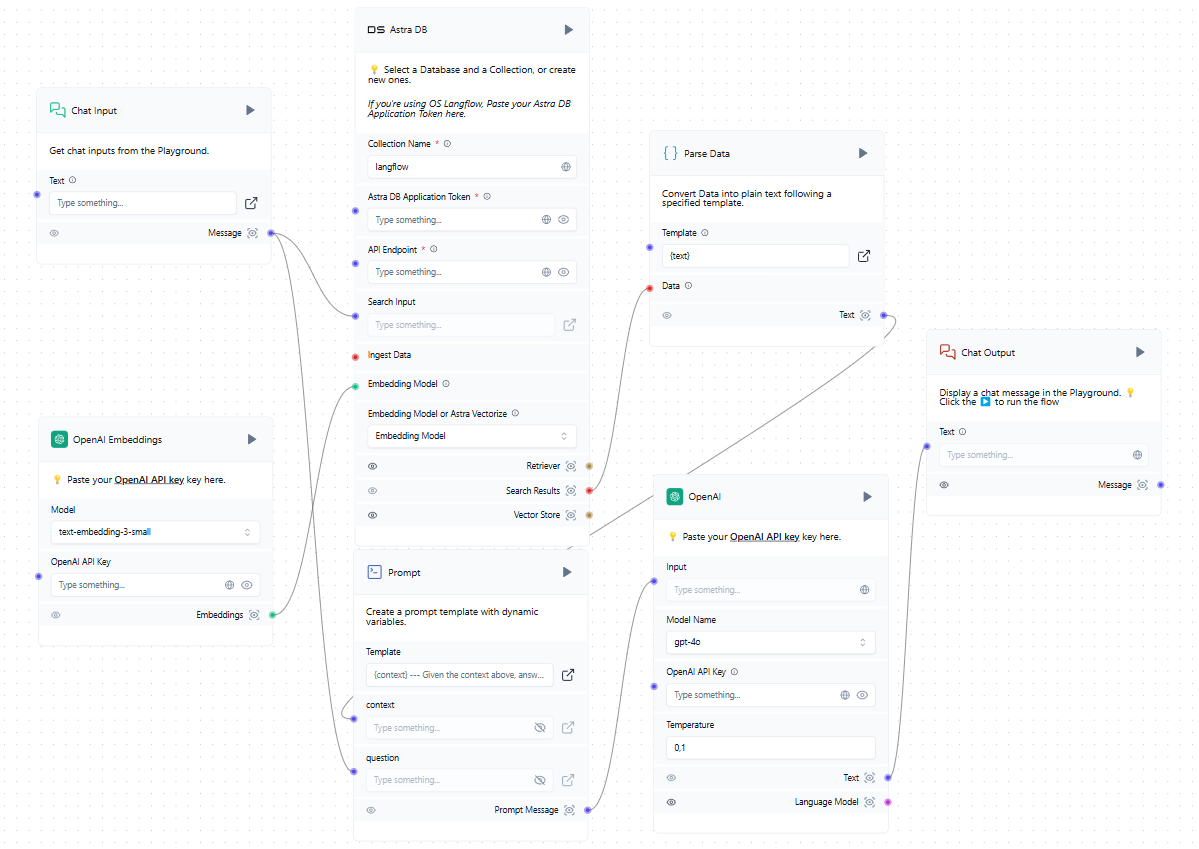
Now that we have a vector database in addition to the trained LLM, we can incorporate it into the general scheme. When a user submits a request in the chat, it simultaneously forms a prompt and queries the vector database. If similar vectors are found, the extracted data is parsed and added as context to the formed prompt. The system then sends a request to the neural network and outputs the received response to the user in the chat.
While the example mentions cloud services like OpenAI and AstraDB, you can use any compatible services, including those deployed locally on LeaderGPU servers. If you can't find the integration you need in the list of available blocks, you can either write it yourself or add one created by someone else.
Quick start
System prepare
The simplest way to deploy Langflow is within a Docker container. To set up the server, begin by installing Docker Engine. Then, update both the package cache and the packages to their latest versions:
sudo apt update && sudo apt -y upgradeInstall additional packages required by Docker:
sudo apt -y install apt-transport-https ca-certificates curl software-properties-commonDownload the GPG key to add the official Docker repository:
curl -fsSL https://download.docker.com/linux/ubuntu/gpg | sudo gpg --dearmor -o /usr/share/keyrings/docker-archive-keyring.gpgAdd the repository to APT using the key you downloaded and installed earlier:
echo "deb [arch=$(dpkg --print-architecture) signed-by=/usr/share/keyrings/docker-archive-keyring.gpg] https://download.docker.com/linux/ubuntu $(lsb_release -cs) stable" | sudo tee /etc/apt/sources.list.d/docker.list > /dev/nullRefresh the package list:
sudo apt updateTo ensure that Docker will be installed from the newly added repository and not from the system one, you can run the following command:
apt-cache policy docker-ceInstall Docker Engine:
sudo apt install docker-ceVerify that Docker has been installed successfully and the corresponding daemon is running and in the active (running) status:
sudo systemctl status docker● docker.service - Docker Application Container Engine
Loaded: loaded (/lib/systemd/system/docker.service; enabled; vendor preset>
Active: active (running) since Mon 2024-11-18 08:26:35 UTC; 3h 27min ago
TriggeredBy: ● docker.socket
Docs: https://docs.docker.com
Main PID: 1842 (dockerd)
Tasks: 29
Memory: 1.8G
CPU: 3min 15.715s
CGroup: /system.slice/docker.service
Build and run
Everything is ready to build and run a Docker container with Langflow. However, there's one caveat: at the time of writing this guide, the latest version (tagged v1.1.0) has an error and won't start. To avoid this issue, we'll use the previous version, v1.0.19.post2, which works flawlessly right after download.
The simplest approach is to download the project repository from GitHub:
git clone https://github.com/langflow-ai/langflowNavigate to the directory containing the sample deployment configuration:
cd langflow/docker_exampleNow you will need to do two things. First, change the release tag so that a working version (at the time of writing this instruction) is built. Second, add simple authorization so that no one can use the system without knowing the login and password.
Open the configuration file:
sudo nano docker-compose.ymlinstead of the following line:
image: langflowai/langflow:latestspecify the version instead of the latest tag:
image: langflowai/langflow:v1.0.19.post2You also need to add three variables to the environment section:
  - LANGFLOW_AUTO_LOGIN=false
  - LANGFLOW_SUPERUSER=admin
  - LANGFLOW_SUPERUSER_PASSWORD=your_secure_password
The first variable disables access to the web interface without authorization. The second adds the username that will receive system administrator rights. The third adds the corresponding password.
If you plan to store the docker-compose.yml file in a version control system, avoid writing the password directly in this file. Instead, create a separate file with a .env extension in the same directory and store the variable value there.
LANGFLOW_SUPERUSER_PASSWORD=your_secure_passwordIn the docker-compose.yml file, you can now reference a variable instead of directly specifying a password:
LANGFLOW_SUPERUSER_PASSWORD=${LANGFLOW_SUPERUSER_PASSWORD}To prevent accidentally exposing the *.env file on GitHub, remember to add it to .gitignore. This will keep your password reasonably secure from unwanted access.
Now, all that's left is to build our container and run it:
sudo docker compose upOpen the web page at http://[LeaderGPU_IP_address]:7860, and you'll see the authorization form:
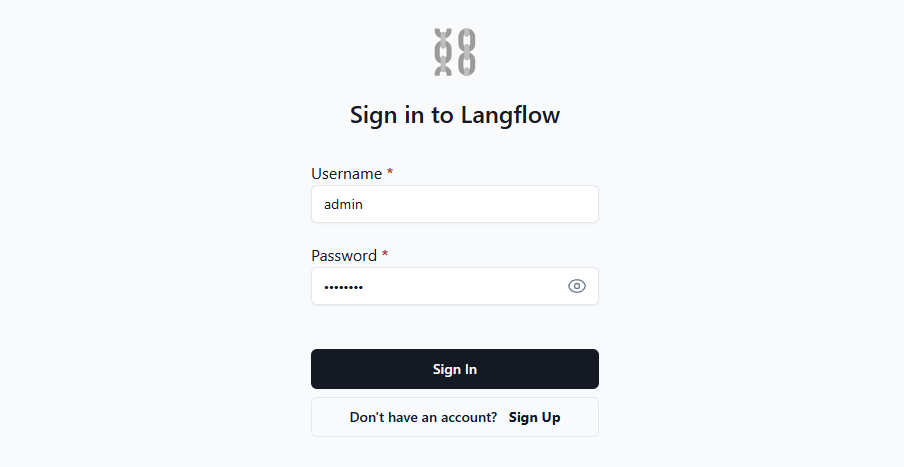
Once you enter your login and password, the system grants access to the web interface where you can create your own applications. For more in-depth guidance, we suggest consulting the official documentation. It provides details on various environment variables that allow easy customization of the system to suit your needs.
See also:
Updated: 04.01.2026
Published: 22.01.2025


