


Blender remote rendering with Flamenco

When rendering heavy scenes in Blender begins to consume too much of your team’s time, you have two options: either upgrade each team member’s computer or outsource rendering to a dedicated farm. Many companies offer ready-made rendering solutions, but if you require full control over the infrastructure, these solutions may not be the most reliable option.
An alternative approach could involve creating a hybrid infrastructure. In this setup, you would keep your data storage and rendering farm management within your existing infrastructure. The only element that would be located outside would be the rented GPU servers on which the rendering would be performed.
In general, the rendering farm infrastructure for Blender looks like this:
Here, we have a central Manager node that organizes all processes. It receives rendering tasks from users via a specific Blender Add-on and moves all necessary files to Shared Storage. Then, the Manager distributes the tasks to Worker nodes. They receive a job containing all information about where the Worker can find files to render and what to do with the results obtained. To implement this scheme, you can use a completely free and open-source application called Flamenco. In this guide, we show how to prepare all nodes, especially the Manager and Worker.
The Storage node doesn’t have any specific requirements. It can be used with any operating system that supports SMB/CIFS or NFS protocols. The only requirement is that the storage directory needs to be mounted and accessible by the operating system. In your infrastructure, this can be any shared folder accessible to all nodes.
Each node has different IP addresses, and the Wireguard VPN server will be a central point that joins them into one L2-network. This server, located on the external perimeter, allows you to work without making changes to the existing NAT policy.
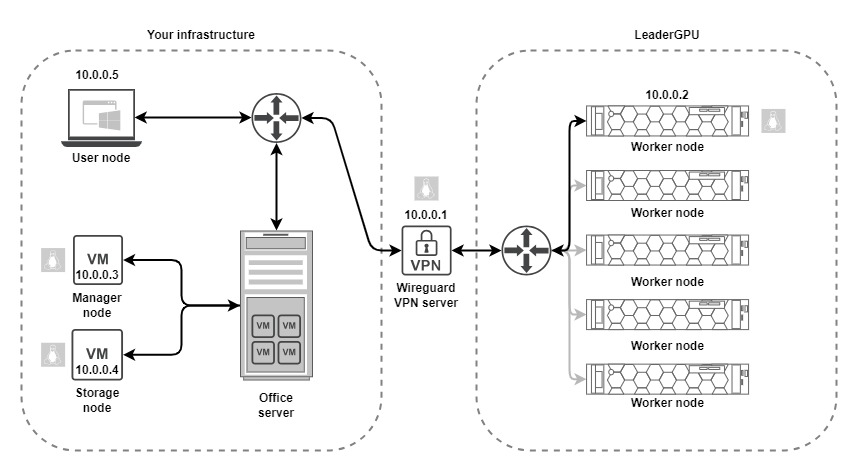
For this example, we create the following mixed configuration:
- 10.0.0.1 - Wireguard VPN server (virtual server by any infrastructure provider) with an external IP;
- 10.0.0.2 - Worker node (dedicated server by LeaderGPU) with an external IP;
- 10.0.0.3 - Manager node (virtual server in office network) located behind NAT;
- 10.0.0.4 - Storage node (virtual server in office network) located behind NAT;
- 10.0.0.5 - User node (consumer laptop in office network) located behind NAT.
Step 1. Wireguard
VPN Server
You can install and configure Wireguard manually, using an official guide and examples. However, there is an easier alternative: unofficial script by software engineer from Paris (Stanislas aka angristan).
Download the script from GitHub:
wget https://raw.githubusercontent.com/angristan/wireguard-install/master/wireguard-install.shMake it executable:
sudo chmod +x wireguard-install.shExecute:
sudo ./wireguard-install.shFollow the instructions and set the IP address range 10.0.0.1/24. The system will ask you to immediately create a configuration file for the first client. According to the plan, this client will be the worker node with name Worker and address 10.0.0.2. When the script is completed, a configuration file will appear in the root directory: /root/wg0-client-Worker.conf.
Execute the following command to view this configuration:
cat /home/usergpu/wg0-client-Worker.conf[Interface]
PrivateKey = [CLIENT_PRIVATE_KEY]
Address = 10.0.0.2/32,fd42:42:42::2/128
DNS = 1.1.1.1,1.0.0.1
[Peer]
PublicKey = [SERVER_PRIVATE_KEY]
PresharedKey = [SERVER_PRESHARED_KEY]
Endpoint = [IP_ADDRESS:PORT]
AllowedIPs = 10.0.0.0/24,::/0Execute installation script again to create another client. Add all future clients this way, and finally, you can check that all configuration files were created:
cd ~/ls -l | grep wg0-rw-r--r-- 1 root root 529 Jul 14 12:59 wg0-client-Manager.conf -rw-r--r-- 1 root root 529 Jul 14 12:59 wg0-client-Storage.conf -rw-r--r-- 1 root root 529 Jul 14 12:59 wg0-client-User.conf -rw-r--r-- 1 root root 529 Jul 14 12:58 wg0-client-Worker.conf
VPN Clients
VPN clients include all nodes that need to be connected to a single network. In our guide, this refers to the manager node, storage node, client node (if using Linux), and worker nodes. If the VPN server is running on a worker node, it does not need to be configured as a client (this step can be skipped).
Update the packages cache repository, then install Wireguard and CIFS support packages:
sudo apt update && sudo apt -y install wireguard cifs-utilsElevate privileges to superuser:
sudo -iOpen the Wireguard configuration directory:
cd /etc/wireguardExecute the umask command so that only the superuser has access to files in this directory:
umask 077Generate a private key and save it into a file:
wg genkey > private-keyGenerate a public key using the private key:
wg pubkey > public-key < private-keyCreate a configuration file:
nano /etc/wireguard/wg0.confPaste your own configuration, created for this client:
[Interface]
PrivateKey = [CLIENT_PRIVATE_KEY]
Address = 10.0.0.2/32,fd42:42:42::2/128
DNS = 1.1.1.1,1.0.0.1
[Peer]
PublicKey = [SERVER_PRIVATE_KEY]
PresharedKey = [SERVER_PRESHARED_KEY]
Endpoint = [SERVER_IP_ADDRESS:PORT]
AllowedIPs = 10.0.0.0/24,::/0
PersistentKeepalive = 1
Don’t forget to add the PersistentKeepalive = 1 option (where 1 means 1 second) on every node located behind NAT. You can choose this period experimentally. The recommended value by Wireguard’s authors is 25. Save the file and exit, using the CTRL + X shortcut and the Y key to confirm.
If you want to passthrough internet trafic set AllowedIPs to 0.0.0.0/0,::/0
Then, logout from the root account:
exitStart the connection using systemctl:
sudo systemctl start wg-quick@wg0.serviceCheck that everything is OK and the service has started successfully:
sudo systemctl status wg-quick@wg0.service● wg-quick@wg0.service - WireGuard via wg-quick(8) for wg0
Loaded: loaded (/lib/systemd/system/wg-quick@.service; enabled; vendor preset: enabled)
Active: active (exited) since Mon 2023-10-23 09:47:53 UTC; 1h 45min ago
Docs: man:wg-quick(8)
man:wg(8)
https://www.wireguard.com/
https://www.wireguard.com/quickstart/
https://git.zx2c4.com/wireguard-tools/about/src/man/wg-quick.8
https://git.zx2c4.com/wireguard-tools/about/src/man/wg.8
Process: 4128 ExecStart=/usr/bin/wg-quick up wg0 (code=exited, status=0/SUCCESS)
Main PID: 4128 (code=exited, status=0/SUCCESS)
CPU: 76ms
If you encounter an error such as «resolvconf: command not found» in Ubuntu 22.04 simply create a symbol link:
sudo ln -s /usr/bin/resolvectl /usr/local/bin/resolvconfEnable the new service to connect automatically while the operating system is booting:
sudo systemctl enable wg-quick@wg0.serviceNow, you can check connectivity by sending echo packets:
ping 10.0.0.1PING 10.0.0.1 (10.0.0.1) 56(84) bytes of data. 64 bytes from 10.0.0.1: icmp_seq=1 ttl=64 time=145 ms 64 bytes from 10.0.0.1: icmp_seq=2 ttl=64 time=72.0 ms 64 bytes from 10.0.0.1: icmp_seq=3 ttl=64 time=72.0 ms 64 bytes from 10.0.0.1: icmp_seq=4 ttl=64 time=72.2 ms --- 10.0.0.1 ping statistics --- 4 packets transmitted, 4 received, 0% packet loss, time 3004ms rtt min/avg/max/mdev = 71.981/90.230/144.750/31.476 ms
Step 2. NAS node
Connect to the VPN server using the guide from Step 1. Then, install the server and client Samba packages:
sudo apt install samba samba-clientBackup your default configuration:
sudo cp /etc/samba/smb.conf /etc/samba/smb.conf.bakCreate a directory that will be used as a share:
sudo mkdir /mnt/shareCreate a new user group that will get access to the new share:
sudo groupadd smbusersAdd an existing user to the created group:
sudo usermod -aG smbusers userSet a password for this user. This is a necessary step because the system password and tha Samba password are different entities:
sudo smbpasswd -a $USERRemove the default configuration:
sudo rm /etc/samba/smb.confAnd create a new one:
sudo nano /etc/samba/smb.conf[global]
workgroup = WORKGROUP
security = user
map to guest = bad user
wins support = no
dns proxy = no
[private]
path = /mnt/share
valid users = @smbusers
guest ok = no
browsable = yes
writable = yesSave the file and test the new parameters:
testparm -sRestart both Samba services:
sudo service smbd restartsudo service nmbd restartFinally, give the permission to share the folder:
sudo chown user:smbusers /mnt/shareStep 3. Samba client connection
All nodes in Flamenco use a shared directory located at /mnt/flamenco. You must mount this directory on each node before running the flamenco-client or flamenco-manager scripts. In this example, we use a worker node hosted on LeaderGPU with the username usergpu. Please replace these details with your own if they differ.
Create a hidden file where you can store SMB share credentials:
nano /home/usergpu/.smbcredentialsType these two strings:
username=user # your Samba username
password=password # your Samba password
Save this file and exit. Then, secure this file by changing the access permissions:
sudo chmod 600 /home/usergpu/.smbcredentialsCreate a new directory that can be used as a mount point to attach the remote storage:
sudo mkdir /mnt/flamencoAnd make the user the owner of this directory:
sudo chown usergpu:users /mnt/flamencoThe only thing left is to have the network directory mounted automatically:
sudo nano /etc/systemd/system/mnt-flamenco.mount[Unit]
Description=Mount Remote Storage
[Mount]
What=//10.0.0.4/private
Where=/mnt/flamenco
Type=cifs
Options=mfsymlinks,credentials=/home/usergpu/.smbcredentials,uid=usergpu,gid=users
[Install]
WantedBy=multi-user.targetAdd two lines to your VPN configuration in the [Interface] section:
sudo -inano /etc/wireguard/wg0.conf
…
PostUp = ping 10.0.0.4 -c 4 && systemctl start mnt-flamenco.mount
PostDown = systemctl stop mnt-flamenco.mount
…
Reboot the server:
sudo shutdown -r nowCheck that the services are loaded and the shared directory is successfully mounted:
df -hFilesystem Size Used Avail Use% Mounted on
tmpfs 35G 3.3M 35G 1% /run
/dev/sda2 99G 18G 77G 19% /
tmpfs 174G 0 174G 0% /dev/shm
tmpfs 5.0M 0 5.0M 0% /run/lock
tmpfs 35G 8.0K 35G 1% /run/user/1000
//10.0.0.4/private 40G 9.0G 31G 23% /mnt/flamencoStep 4. Manager node
Set up a VPN connection using the guide from Step 1. Stop the VPN service before continuing:
sudo systemctl stop wg-quick@wg0.serviceLet’s prepare. Automatic mounting required utilities for the CIFS protocol:
sudo apt -y install cifs-utilsThe next important step is to install Blender. You can do this using the standard APT packet manager, but this will most likely install one of the older versions (less then v3.6.4). Let’s use Snap to install the latest version:
sudo snap install blender --classicCheck the installed version using the following command:
blender --versionBlender 4.4.3
build date: 2025-04-29
build time: 15:12:13
build commit date: 2025-04-29
build commit time: 14:09
build hash: 802179c51ccc
build branch: blender-v4.4-release
build platform: Linux
build type: Release
…If you receive an error message indicating missing libraries, simply install them. All these libraries are included in the XOrg package:
sudo apt -y install xorgDownload the application:
wget https://flamenco.blender.org/downloads/flamenco-3.7-linux-amd64.tar.gzUnpack the downloaded archive:
tar xvfz flamenco-3.7-linux-amd64.tar.gzGo to the created directory:
cd flamenco-3.7-linux-amd64/And start Flamenco for the first time:
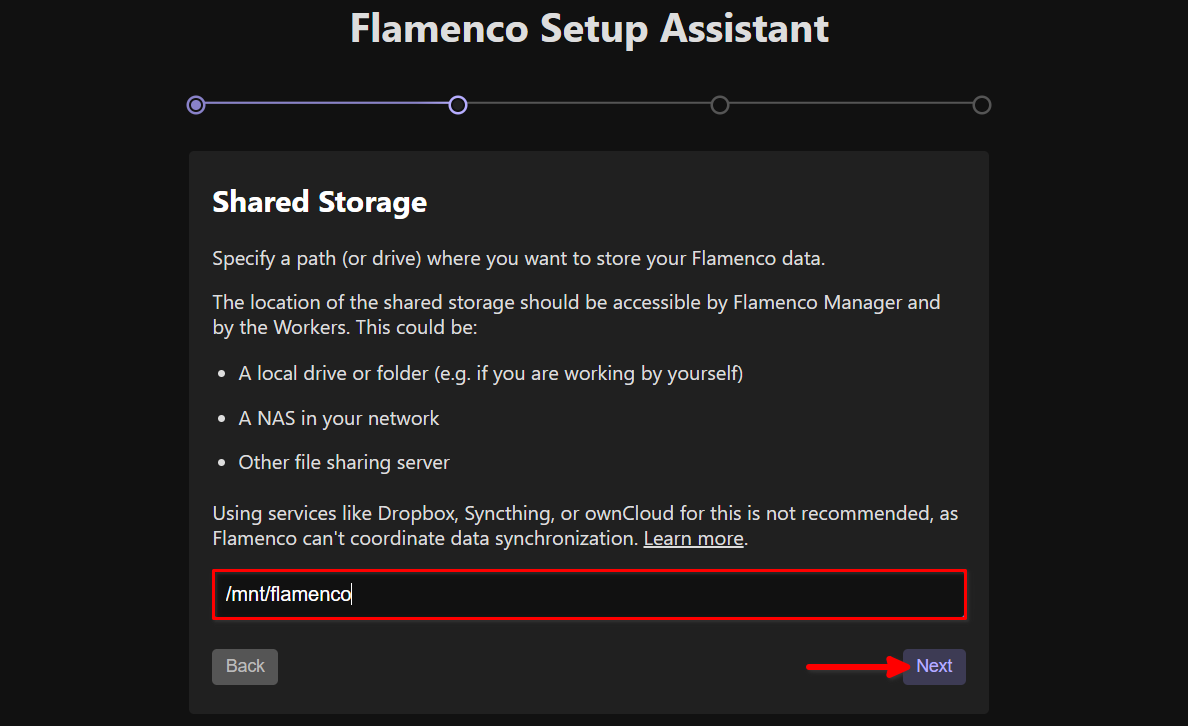
./flamenco-managerOpen the following address in your web-browser: http://10.0.0.3:8080/. Click on the Let's go button. Type /mnt/flamenco in the required field, then click Next:
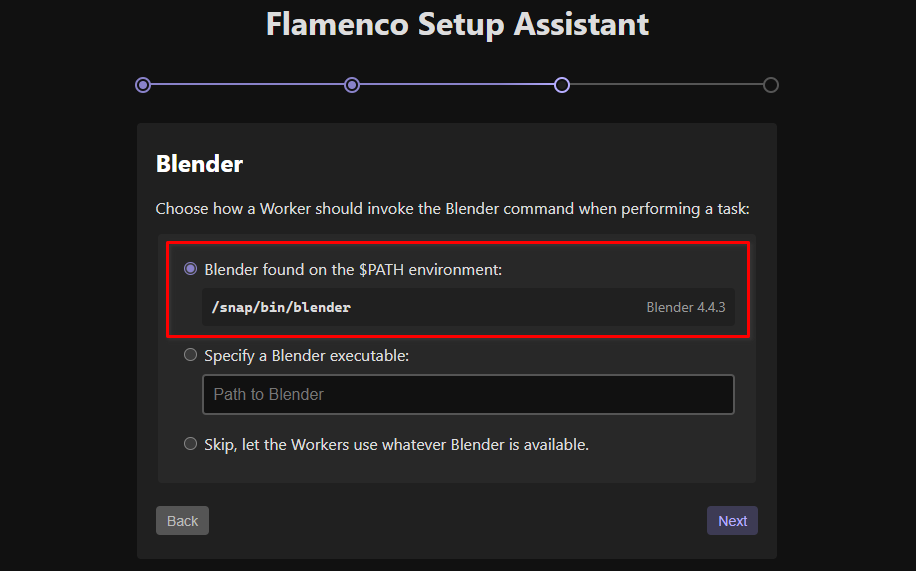
Flamenco will attempt to locate the Blender executable file. If you have installed Blender from Snap, the path will be /snap/bin/blender. Check this point and click Next:
Check the summary and click Confirm:
Return to the SSH session and use the Ctrl + C keyboard shortcut to interrupt the application. The first launch generates the configuration file flamenco-manager.yaml. Let’s add some options to the variables and blenderArgs sections:
nano flamenco-manager.yaml# Configuration file for Flamenco.
# For an explanation of the fields, refer to flamenco-manager-example.yaml
#
# NOTE: this file will be overwritten by Flamenco Manager's web-based configuration system.
#
# This file was written on 2023-10-17 12:41:28 +00:00 by Flamenco 3.7
_meta:
version: 3
manager_name: Flamenco Manager
database: flamenco-manager.sqlite
listen: :8080
autodiscoverable: true
local_manager_storage_path: ./flamenco-manager-storage
shared_storage_path: /mnt/flamenco
shaman:
enabled: true
garbageCollect:
period: 24h0m0s
maxAge: 744h0m0s
extraCheckoutPaths: []
task_timeout: 10m0s
worker_timeout: 1m0s
blocklist_threshold: 3
task_fail_after_softfail_count: 3
variables:
blender:
values:
- platform: linux
value: blender
- platform: windows
value: blender
- platform: darwin
value: blender
storage:
values:
is_twoway: true
values:
- platform: linux
value: /mnt/flamenco
- platform: windows
value: Z:\
- platform: darwin
value: /Volumes/shared/flamenco
blenderArgs:
values:
- platform: all
value: -b -y -E CYCLES -P gpurender.pyThe first additional block describes additional Two-way variables, which are needed for multi-platform farms. This solves the main problem with slashes and paths. In Linux, we use the forward slash symbol (/) as a separator, but in Windows, we use the backslash symbol (\). Here, we create the replacement rule for all available alternatives: Linux, Windows and macOS (Darwin).
When you mount network share in Windows, you need to choose a drive letter. For example our Storage is mounted with Z: letter. The replacement rule tells the system that for the Windows platform, the /mnt/flamenco path will be located at Z:\. For macOS, this path will be /Volumes/shared/flamenco.
Look at the second added block. This instructs Blender to use Cycles rendering engine and calls a simple Python script, gpurender.py, when Blender executes. This is a simple trick to select the GPU instead of the CPU. There is no standard option to do this directly. You can’t invoke blender --use-gpu or something similar. However, you can invoke any external Python script using the -P option. This command instructs the Worker to find a script in the local directory and execute it when the assigned job invokes the Blender executable.
Now, we can delegate control of the application to the systemd init subsystem. Let’s inform the system about the location of the working directory, the executable file, and the user privileges required for launching. Create a new file:
sudo nano /etc/systemd/system/flamenco-manager.serviceFill it with the following strings:
[Unit]
Description=Flamenco Manager service
[Service]
User=user
WorkingDirectory=/home/user/flamenco-3.7-linux-amd64
ExecStart=/home/user/flamenco-3.7-linux-amd64/flamenco-manager
Restart=always
[Install]
WantedBy=multi-user.target
Save the file and exit the nano text editor.
sudo systemctl daemon-reloadsudo systemctl start flamenco-manager.servicesudo systemctl status flamenco-manager.service● flamenco-manager.service - Flamenco Manager service
Loaded: loaded (/etc/systemd/system/flamenco-manager.service; disabled; vendor preset: enabled)
Active: active (running) since Tue 2023-10-17 11:03:50 UTC; 7s ago
Main PID: 3059 (flamenco-manage)
Tasks: 7 (limit: 4558)
Memory: 28.6M
CPU: 240ms
CGroup: /system.slice/flamenco-manager.service
└─3059 /home/user/flamenco-3.7-linux-amd64/flamenco-manager
Enable automatic start when the system boots:
sudo systemctl enable flamenco-manager.serviceStep 5. Worker node
Connect to the VPN server using the guide from Step 1 and mount the share from Step 3. Stop the VPN service before continuing:
sudo snap install blender --classicModern *.blend files are compressed with the Zstandard algorithm. To avoid mistakes, it is essential to incorporate support for this algorithm:
sudo apt -y install python3-zstdDownload the application:
wget https://flamenco.blender.org/downloads/flamenco-3.7-linux-amd64.tar.gzUnpack the downloaded archive:
tar xvfz flamenco-3.7-linux-amd64.tar.gzNavigate to the created directory:
cd flamenco-3.7-linux-amd64/Create an additional script that enables GPU rendering when Flamenco jobs runs:
nano gpurender.pyimport bpy
def enable_gpus(device_type, use_cpus=False):
preferences = bpy.context.preferences
cycles_preferences = preferences.addons["cycles"].preferences
cycles_preferences.refresh_devices()
devices = cycles_preferences.devices
if not devices:
raise RuntimeError("Unsupported device type")
activated_gpus = []
for device in devices:
if device.type == "CPU":
device.use = use_cpus
else:
device.use = True
activated_gpus.append(device.name)
print('activated gpu', device.name)
cycles_preferences.compute_device_type = device_type
bpy.context.scene.cycles.device = "GPU"
return activated_gpus
enable_gpus("CUDA")Save the file and exit. Then, create a separate service to run Flamenco from systemd:
sudo nano /etc/systemd/system/flamenco-worker.service[Unit]
Description=Flamenco Worker service
[Service]
User=usergpu
WorkingDirectory=/home/usergpu/flamenco-3.7-linux-amd64
ExecStart=/home/usergpu/flamenco-3.7-linux-amd64/flamenco-worker
Restart=always
[Install]
WantedBy=multi-user.targetReload configuration and start the new service:
sudo systemctl daemon-reloadsudo systemctl start flamenco-worker.servicesudo systemctl status flamenco-worker.service● flamenco-worker.service - Flamenco Worker service
Loaded: loaded (/etc/systemd/system/flamenco-worker.service; enabled; preset: enabled)
Active: active (running) since Tue 2023-10-17 13:56:18 EEST; 47s ago
Main PID: 636 (flamenco-worker)
Tasks: 5 (limit: 23678)
Memory: 173.9M
CPU: 302ms
CGroup: /system.slice/flamenco-worker.service
└─636 /home/user/flamenco-3.7-linux-amd64/flamenco-worker
Enable automatic start when the system boots:
sudo systemctl enable flamenco-worker.serviceStep 6. User node
User node can be managed with any operating system. For this guide, we show how to set up a node with Windows 11 and 4 necessary components:
- VPN connection
- Mounted remote directory
- Blender installed
- Flamenco add-on
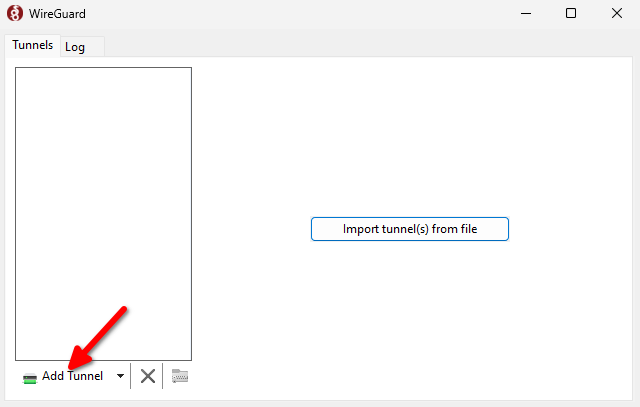
Download and install Wireguard from the official website. Create a new text file and paste the configuration, generated for the client in Step 1. Rename the file to flamenco.conf and add it in Wireguard using the Add tunnel button:
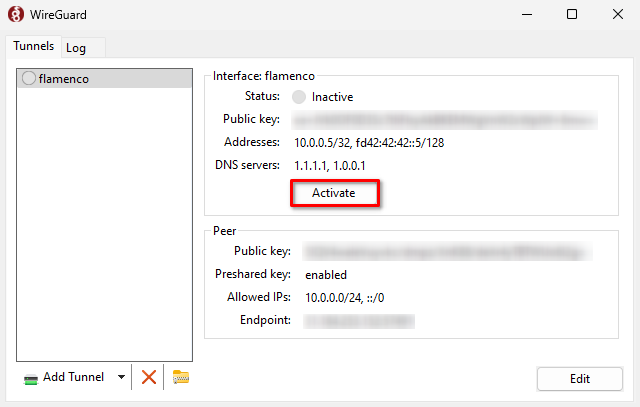
Connect to your server by pressing the Activate button:
Let’s mount a remote directory. Right-click on This PC and select Map network drive…
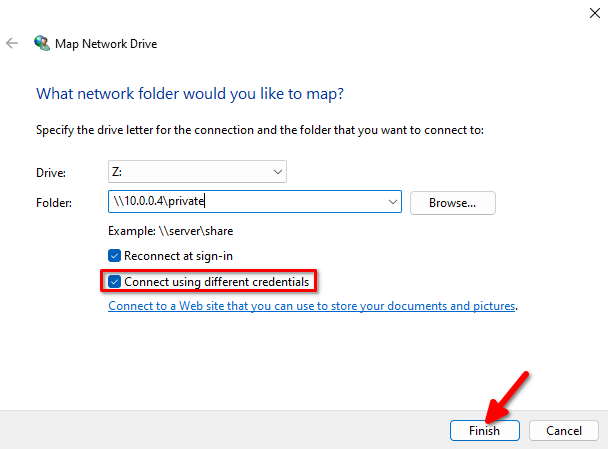
Choose Z: as the drive letter, type the Samba share address \\10.0.0.4\private and don’t forget to tick Connect using different credentials. Then click Finish. The system will ask you to enter a username and password for the share. After that, the network directory will be mounted as the Z: drive.
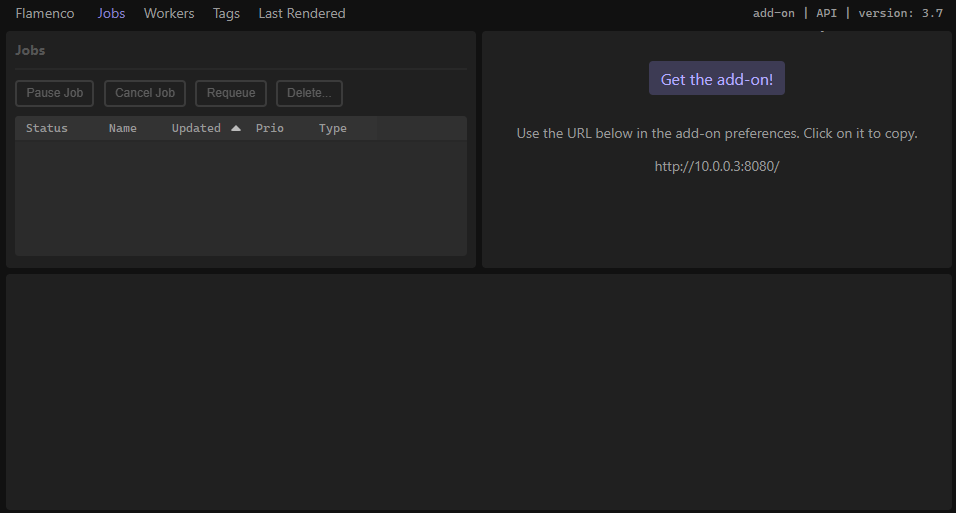
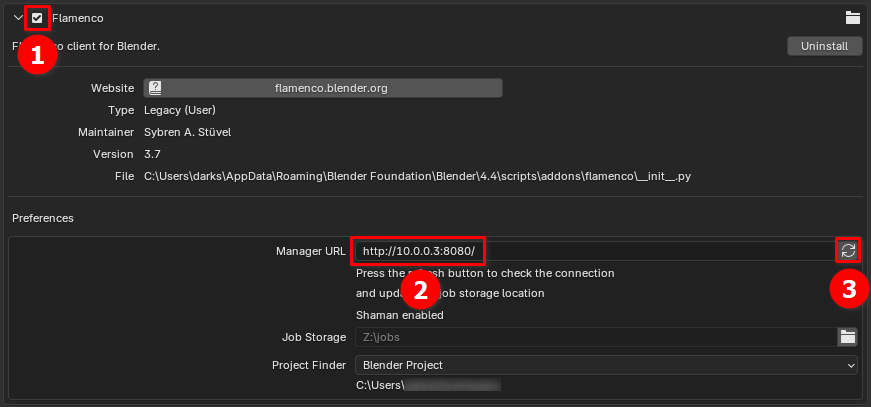
Download and install Blender from the official website. Then, open the URL http://10.0.0.3:8080/flamenco3-addon.zip and install the Flamenco add-on. Activate it in preferences: Edit > Preferences > Add-ons. Tick System: Flamenco 3, enter the Manager URL http://10.0.0.3:8080, and click the refresh button. The system will connect to the manager node and load storage settings automatically:
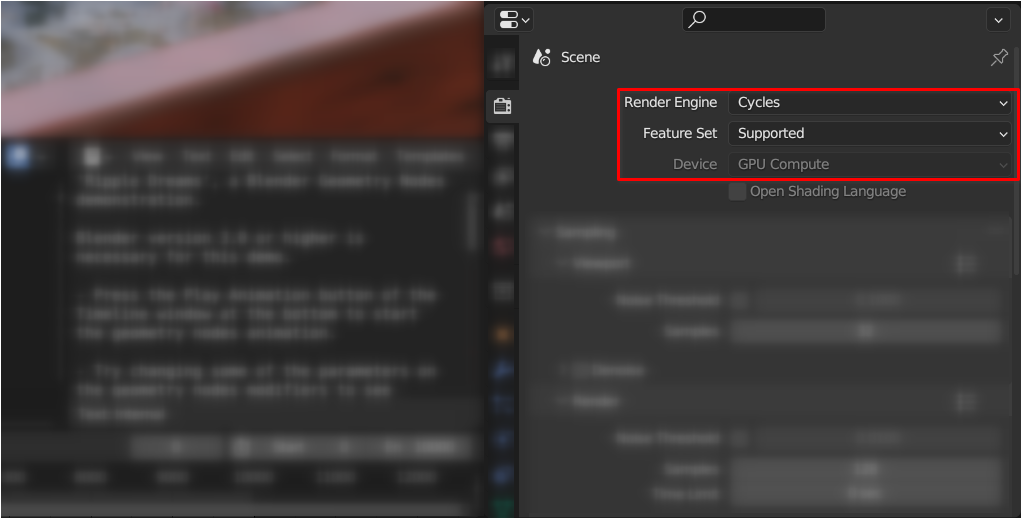
Open the file that you need to render. On the Scene tab, choose Cycles from the Render Engine drop-down list. Don’t forget to save the file, because these settings are stored directly in the *.blend file:
Scroll down and find the Flamenco 3 section. Click Fetch job types to get a list of available types. Select Simple Blender Render from the drop-down list and set other options, such as the number of frames, chunk size, and output folder. Finally, click Submit to Flamenco:
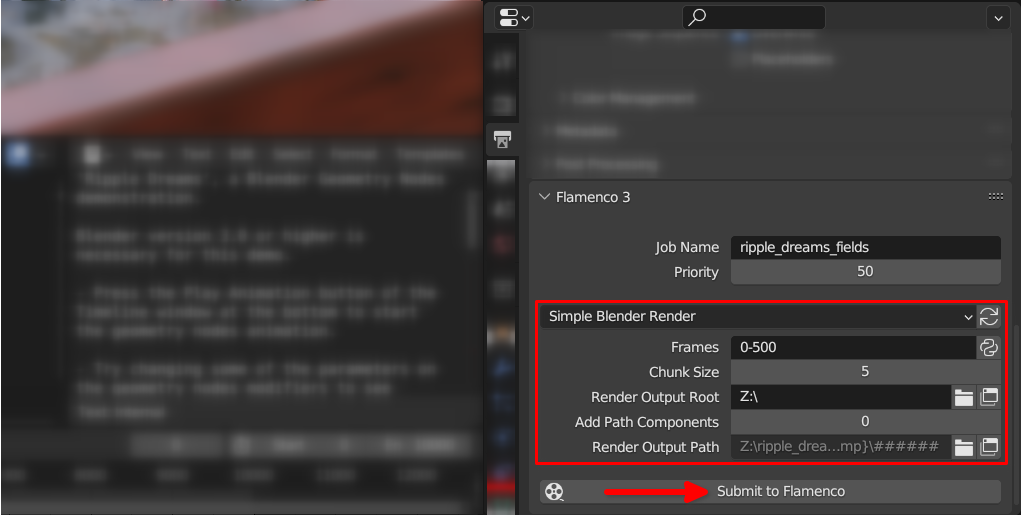
The Flamenco add-on creates a new job and uploads a blend file to shared storage. The system will submit the job to an available worker and start the rendering process:

If you check the GPU’s load with nvtop or similar utilities, it shows that all GPUs have compute tasks:
 You will find the result in a directory that you selected in the previous step. Example here (Ripple Dreams by James Redmond)
See also:
Updated: 04.01.2026
Published: 21.01.2025


