


Triton™ Inference Server
Business requirements may vary, but they all share one core principle: systems must operate quickly and deliver the highest possible quality. When dealing with neural network inference, efficient use of computing resources becomes crucial. Any GPU underutilization or idle time directly translates to financial losses.
Consider a marketplace as an example. These platforms host numerous products, each with multiple attributes: text descriptions, technical specifications, categories, and multimedia content like photos and videos. All content requires moderation to maintain fair conditions for sellers and prevent prohibited goods or illegal content from appearing on the platform.
While manual moderation is possible, it’s slow and inefficient. In today’s competitive environment, sellers need to expand their product range quickly: the faster items appear on the marketplace, the better chances of being discovered and purchased. Manual moderation is also costly and prone to human error, potentially allowing inappropriate content through.
Automatic moderation using specially trained neural networks offers a solution. This approach brings multiple benefits: it substantially reduces the moderation costs while typically improving quality. Neural networks process content much faster than humans, allowing sellers to clear the moderation stage more quickly, especially when handling large products volumes.
The approach does have its challenges. Implementing automated moderation requires developing and training neural network models, demanding both skilled personnel and substantial computing resources. However, the benefits become apparent quickly after initial implementation. Adding automated model deployment can significantly streamline ongoing operations.
Inference
Assume we’ve figured out the machine learning procedures. The next step is determining how to run model inference on a rented server. For a single model, you typically choose a tool that works well with the specific framework it was built on. However, when dealing with multiple models created in different frameworks, you have two options.
You can either convert all models to a single format, or choose a tool that supports multiple frameworks. Triton™ Inference Server fits perfectly with the second approach. It supports the following backends:
- TensorRT™
- TensorRT-LLM
- vLLM
- Python
- PyTorch (LibTorch)
- ONNX Runtime
- Tensorflow
- FIL
- DALI
Additionally, you can use any application as a backend. For instance, if you need post-processing with a C/C++ application, you can integrate it seamlessly.
Scaling
Triton™ Inference Server efficiently manages computing resources on a single server by running multiple models simultaneously and distributing the workload across GPUs.
Installation is done through a Docker container. DevOps engineers can control GPU allocation at startup, choosing to use all GPUs or limit their number. While the software doesn’t handle horizontal scaling directly, you can use traditional load balancers like HAproxy or deploy applications in a Kubernetes cluster for this purpose.
Preparing the system
To set up Triton™ on a LeaderGPU server running Ubuntu 22.04, first update the system using this command:
sudo apt update && sudo apt -y upgradeFirst, install the NVIDIA® drivers using the autoinstaller script:
sudo ubuntu-drivers autoinstallReboot the server to apply the changes:
sudo shutdown -r nowOnce the server is back online, install Docker using the following installation script:
curl -sSL https://get.docker.com/ | shSince Docker can’t pass through GPUs to containers by default, you’ll need the NVIDIA® Container Toolkit. Add the NVIDIA® repository by downloading and registering its GPG key:
curl -fsSL https://nvidia.github.io/libnvidia-container/gpgkey | sudo gpg --dearmor -o /usr/share/keyrings/nvidia-container-toolkit-keyring.gpg \
&& curl -s -L https://nvidia.github.io/libnvidia-container/stable/deb/nvidia-container-toolkit.list | \
sed 's#deb https://#deb [signed-by=/usr/share/keyrings/nvidia-container-toolkit-keyring.gpg] https://#g' | \
sudo tee /etc/apt/sources.list.d/nvidia-container-toolkit.list
Update the packages cache and install the toolkit:
sudo apt update && sudo apt -y install nvidia-container-toolkitRestart Docker to enable the new capabilities:
sudo systemctl restart dockerThe operating system is now ready to use.
Installing Triton™ Inference Server
Let’s download the project repository:
git clone https://github.com/triton-inference-server/serverThis repository contains pre-configured neural network samples and a model download script. Navigate to the examples directory:
cd server/docs/examplesDownload the models by running the following script, which will save them to ~/server/docs/examples/model_repository:
./fetch_models.shTriton™ Inference Server’s architecture requires models to be stored separately. You can store them either locally in any server directory or on network storage. When starting the server, you’ll need to mount this directory to the container at the /models mount point. This serves as a repository for all model versions.
Launch the container with this command
sudo docker run --gpus=all --rm -p8000:8000 -p8001:8001 -p8002:8002 -v ~/server/docs/examples/model_repository:/models nvcr.io/nvidia/tritonserver:25.01-py3 tritonserver --model-repository=/modelsHere’s what each parameter does:
- --gpus=all specifies that all available GPUs will be used in the server;
- --rm destroy the container after the process is completed or stopped;
- -p8000:8000 forwards port 8000 to receive HTTP requests;
- -p8001:8001 forwards port 8001 to receive gRPC requests;
- -p8002:8002 forwards port 8002 to request metrics;
- -v ~/server/docs/examples/model_repository:/models forwards the directory with models;
- nvcr.io/nvidia/tritonserver:25.01-py3 address of the container from the NGC™ catalog;
- tritonserver --model-repository=/models launch the Triton™ Inference Server with the location of the models repository at /models.
The command output will show all available models in the repository, each ready to accept requests:
+----------------------+---------+--------+
| Model                | Version | Status |
+----------------------+---------+--------+
| densenet_onnx        | 1       | READY  |
| inception_graphdef   | 1       | READY  |
| simple               | 1       | READY  |
| simple_dyna_sequence | 1       | READY  |
| simple_identity      | 1       | READY  |
| simple_int8          | 1       | READY  |
| simple_sequence      | 1       | READY  |
| simple_string        | 1       | READY  |
+----------------------+---------+--------+
The three services have been successfully launched on ports 8000, 8001, and 8002:
I0217 08:00:34.930188 1 grpc_server.cc:2466] Started GRPCInferenceService at 0.0.0.0:8001
I0217 08:00:34.930393 1 http_server.cc:4636] Started HTTPService at 0.0.0.0:8000
I0217 08:00:34.972340 1 http_server.cc:320] Started Metrics Service at 0.0.0.0:8002
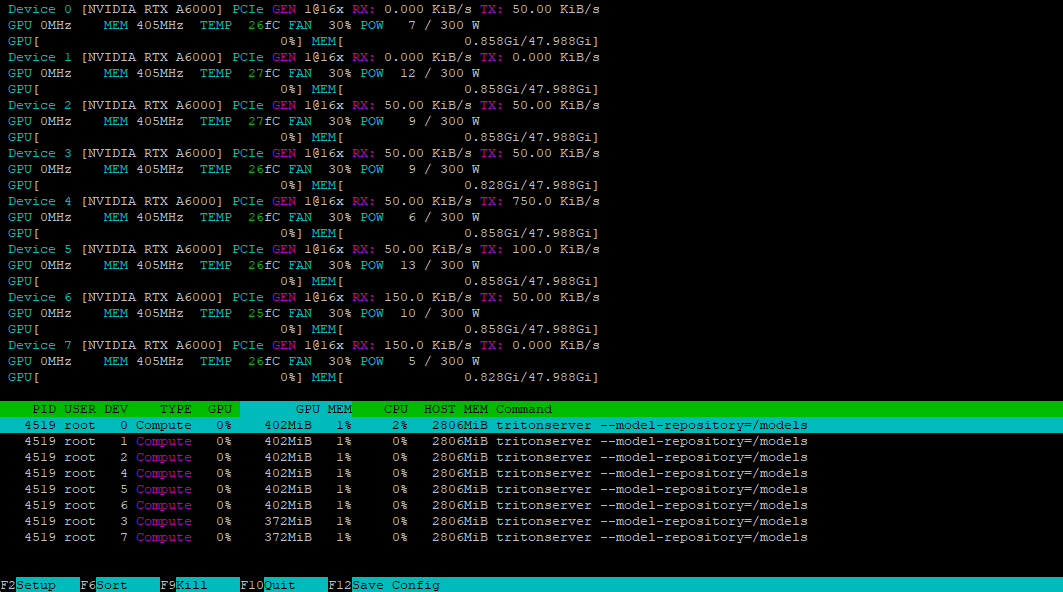
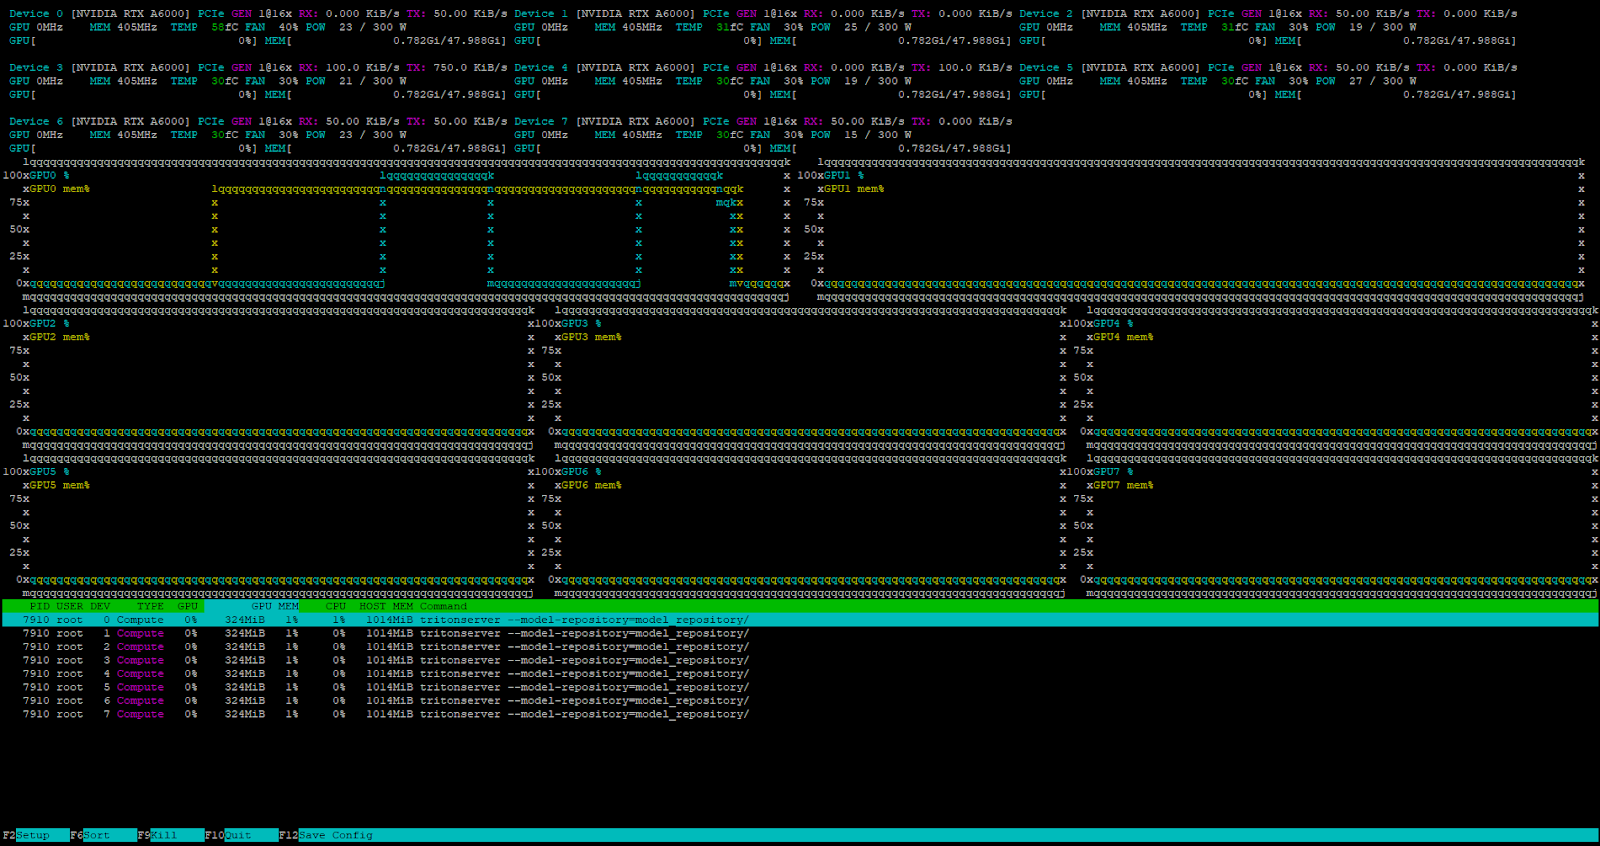
Using the nvtop utility, we can verify that all GPUs are ready to accept the load:
Installing the client
To access our server, we’ll need to generate an appropriate request using the client included in the SDK. We can download this SDK as a Docker container:
sudo docker pull nvcr.io/nvidia/tritonserver:25.01-py3-sdkRun the container in interactive mode to access the console:
sudo docker run -it --gpus=all --rm --net=host nvcr.io/nvidia/tritonserver:25.01-py3-sdkLet’s test this with the DenseNet model in ONNX format, using the INCEPTION method to preprocess and analyze image mug.jpg:
/workspace/install/bin/image_client -m densenet_onnx -c 3 -s INCEPTION /workspace/images/mug.jpgThe client will contact the server, which will create a batch and process it using the container’s available GPUs. Here’s the output:
Request 0, batch size 1
Image '/workspace/images/mug.jpg':
   15.349562 (504) = COFFEE MUG
   13.227461 (968) = CUP
   10.424891 (505) = COFFEEPOT
Preparing the repository
For Triton™ to manage models correctly, you must prepare the repository in a specific way. Here’s the directory structure:
model_repository/
        └── your_model/
                ├── config.pbtxt
                └── 1/
                    └── model.*
Each model needs its own directory containing a config.pbtxt configuration file with its description. Here’s an example:
name: "Test"
platform: "pytorch_libtorch"
max_batch_size: 8
input [
  {
    name: "INPUT_0"
    data_type: TYPE_FP32
    dims: [ 3, 224, 224 ]
  }
]
output [
  {
    name: "OUTPUT_0"
    data_type: TYPE_FP32
    dims: [ 1000 ]
  }
]
In this example, a model named Test will run on the PyTorch backend. The max_batch_size parameter sets the maximum number of items that can be processed simultaneously, enabling efficient load balancing across resources. Setting this value to zero disables batching, causing the model to process requests sequentially.
The model accepts one input and produces one output, both using the FP32 number type. The parameters must match the model’s requirements exactly. For image processing, a typical dimension specification is dims: [ 3, 224, 224 ], where:
- 3 - number of color channels (RGB);
- 224 - image height in pixels;
- 224 - image width in pixels.
The output dims: [ 1000 ] represents a one-dimensional vector of 1000 elements, which suits image classification tasks. To determine the correct dimensionality for your model, consult its documentation. If the configuration file is incomplete, Triton™ will attempt to generate any missing parameters automatically.
Launching a custom model
Let’s launch the inference of the distilled DeepSeek-R1 model we discussed earlier. First, we’ll create the necessary directory structure:
mkdir ~/model_repository && mkdir ~/model_repository/deepseek && mkdir ~/model_repository/deepseek/1Navigate to the model directory:
cd ~/model_repository/deepseekCreate a configuration file config.pbtxt:
nano config.pbtxtPaste the following:
# Copyright 2023, NVIDIA CORPORATION & AFFILIATES. All rights reserved.
#
# Redistribution and use in source and binary forms, with or without
# modification, are permitted provided that the following conditions
# are met:
#  * Redistributions of source code must retain the above copyright
#    notice, this list of conditions and the following disclaimer.
#  * Redistributions in binary form must reproduce the above copyright
#    notice, this list of conditions and the following disclaimer in the
#    documentation and/or other materials provided with the distribution.
#  * Neither the name of NVIDIA CORPORATION nor the names of its
#    contributors may be used to endorse or promote products derived
#    from this software without specific prior written permission.
#
# THIS SOFTWARE IS PROVIDED BY THE COPYRIGHT HOLDERS ``AS IS'' AND ANY
# EXPRESS OR IMPLIED WARRANTIES, INCLUDING, BUT NOT LIMITED TO, THE
# IMPLIED WARRANTIES OF MERCHANTABILITY AND FITNESS FOR A PARTICULAR
# PURPOSE ARE DISCLAIMED.  IN NO EVENT SHALL THE COPYRIGHT OWNER OR
# CONTRIBUTORS BE LIABLE FOR ANY DIRECT, INDIRECT, INCIDENTAL, SPECIAL,
# EXEMPLARY, OR CONSEQUENTIAL DAMAGES (INCLUDING, BUT NOT LIMITED TO,
# PROCUREMENT OF SUBSTITUTE GOODS OR SERVICES; LOSS OF USE, DATA, OR
# PROFITS; OR BUSINESS INTERRUPTION) HOWEVER CAUSED AND ON ANY THEORY
# OF LIABILITY, WHETHER IN CONTRACT, STRICT LIABILITY, OR TORT
# (INCLUDING NEGLIGENCE OR OTHERWISE) ARISING IN ANY WAY OUT OF THE USE
# OF THIS SOFTWARE, EVEN IF ADVISED OF THE POSSIBILITY OF SUCH DAMAGE.

# Note: You do not need to change any fields in this configuration.

backend: "vllm"

# The usage of device is deferred to the vLLM engine
instance_group [
  {
    count: 1
    kind: KIND_MODEL
  }
]
Save the file by pressing Ctrl + O, then the editor with Ctrl + X. Navigate to the directory 1:
cd 1Create a model configuration file model.json with the following parameters:
{
    "model":"deepseek-ai/DeepSeek-R1-Distill-Llama-8B",
    "disable_log_requests": true,
    "gpu_memory_utilization": 0.9,
    "enforce_eager": true
}
Note that the gpu_memory_utilization value varies by GPU and should be determined experimentally. For this guide, we’ll use 0.9. Your directory structure inside ~/model_repository should now look like this:
└── deepseek
        ├── 1
        │   └── model.json
        └── config.pbtxt
Set the LOCAL_MODEL_REPOSITORY variable for convenience:
LOCAL_MODEL_REPOSITORY=~/model_repository/Start the inference server with this command:
sudo docker run --rm -it --net host --shm-size=2g --ulimit memlock=-1 --ulimit stack=67108864 --gpus all -v $LOCAL_MODEL_REPOSITORY:/opt/tritonserver/model_repository nvcr.io/nvidia/tritonserver:25.01-vllm-python-py3 tritonserver --model-repository=model_repository/Here’s what each parameter does:
- --rm automatically removes the container after stopping;
- -it runs the container in interactive mode with terminal output;
- --net host uses the host’s network stack instead of container isolation;
- --shm-size=2g sets shared memory to 2 GB;
- --ulimit memlock=-1 removes memory lock limit;
- --ulimit stack=67108864 sets stack size to 64 MB;
- --gpus all enables access to all server GPUs;
- -v $LOCAL_MODEL_REPOSITORY:/opt/tritonserver/model_repository mounts the local model directory in the container;
- nvcr.io/nvidia/tritonserver:25.01-vllm-python-py3 specifies the container with vLLM backend support;
- tritonserver --model-repository=model_repository/ launch the Triton™ Inference Server with the location of the models repository at model_repository.
Test the server by sending a request with curl, using a simple prompt and a 4096 token response limit:
curl -X POST localhost:8000/v2/models/deepseek/generate -d '{"text_input": "Tell me about the Netherlands?", "max_tokens": 4096}'The server successfully receives and processes the request.
The internal Triton™ task scheduler handles all incoming requests when the server is under load.
Conclusion
Triton™ Inference Server excels at deploying machine learning models in production by efficiently distributing requests across available GPUs. This maximizes the use of rented server resources and reduces computing infrastructure costs. The software works with various backends, including vLLM for large language models.
Since it installs as a Docker container, you can easily integrate it into any modern CI/CD pipeline. Try it yourself by renting a server from LeaderGPU.
Updated: 12.08.2025
Published: 26.02.2025


